|
Permissions are defined at the role or user group level, as opposed to the individual user level, so that while membership of the groups may change, the permissions can remain fixed. Of course if you want a specific user permission then simply make them a user group, or more precisely create a user group with that user as the sole member.
It should be noted that user groups are atomic when it comes to entity permissions, that is they can't inherit permissions or users from one to another, and if a user belongs to multiple groups then the most 'optimistic' group permission will take precedence on a case-by-case basis for each individual permission (i.e. Create-Read-Update-Delete). For example if the same user is a member of Group A and Group B and Group A has just Create-Update permission for Application component types while Group B has just Read-Update permission for Application component types then the user will have Create-Read-Update permission for Application component instances.
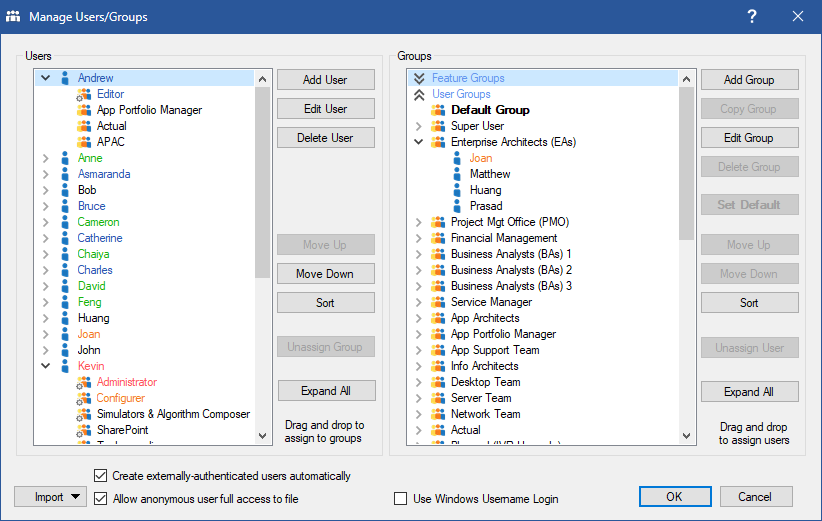
Furthermore, by default, anonymous users (that is users who have not been defined or who have not logged in) have full access to the project. This is to ensure that access is available in an initial configuration. To block access by anonymous users simply uncheck the 'Allow anonymous user full access to file' option in the Manage Users/Groups dialog shown below. When unchecked anonymous users will only be able to see the Standards portion of any project.
Finally, if the 'Use Windows Username Login' option is checked username authentication is performed against the Windows Username Logins on each user's machine against the username's entered as per below. That is if the Windows Username Login for a given user's machine exists as a valid username then no password is required and the user is automatically authenticated. Note: this effectively allows usage of Windows Active Directory (AD) authentication.
 Note Note
Feature groups enabled based on your Licence allow granting users access to certain features per project in ABACUS can be found under Feature Groups and assigned. For more information on these feature groups, click here.
Users and User Groups
To create a new User
1.Select File | Manage Users/Groups
Note
If you don't see the Manage Users/Groups menu item then you don't have the Administrator capability. Please contact your local ABACUS Administrator if you require this capability.
2.In the dialog that appears select the Add User button and enter a User name and password in the Create New User dialog. Note: User names and passwords are case sensitive.
Note
If the 'Use Windows Username Login' option is checked as described above then a dummy password can be entered as authentication will be performed according to the user's Window's Username Login only.
2.By default you will see that the Users can change their own password. If required, the ABACUS Administrator may remove the ability for users to set their own password by unchecking the check boxes.
Note
If users can change their own password they will have a File | Change password... menu item to do so. Also, be aware that if multiple people use the same username then one user may change the password such that no other people can login afterwards. Accordingly, it is recommended practice to have a single username per actual person.
4.Optionally, enter the Email address, Location and Phone number for the users for future reference.
5.Optionally, check the AE admin/editor permissions as appropriate to enable AE access for the user.
6.Click on the OK button in the Create New User dialog.
7.Click on the OK button.
Note
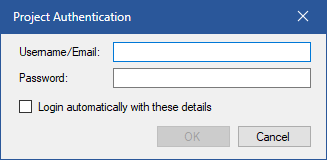
Once you have created your first user you should consider blocking access by anonymous users by unchecking the 'Allow anonymous user full access to file' option in the Manage Users/Groups dialog. Also, once a user has been created (and if its a Collaboration project, the change committed to the server), the next time the project is opened users will be prompted to Login for authenticated access as per the dialog shown below. If the Login automatically with these details option is checked then the user name / password combination will be remembered for the project and applied each time on opening. To clear the saved login select File | Clear Saved Login after opening and you will be prompted to login again next time you open the project.
 Tip Tip
You can easily identify the current user logged in where the username is shown in the titlebar.
Login
To delete an existing User
1.Select File | Manage Users/Groups
2.In the dialog that appears select the User name in the Users panel that you wish to delete and then select the Delete User button.
3.Click on the OK button.
To create a new User Group
1.Select File | Manage Users/Groups
2.In the dialog that appears select the Add Group button and enter a Group name in the Groups panel.
Note
Group names must be unique.
3.Click on the OK button.
To edit a User Groups name
1.Select File | Manage Users/Groups
2.In the dialog that appears select the Edit Group button to begin editing group name and SSO identifier.
3.Rename and check/uncheck the features you wish to enable for the group. For more information about SSO identifer, please click here.
4.Click on the OK button.
To copy an existing User Group
1.Select File | Manage Users/Groups
2.In the dialog that appears select the Copy Group button.
Note
A duplicate group will be created prefixed with "Copy of ". By default all the permissions from the copied group will be duplicated for the "Copy of" group including any user assignment.
3.Rename the "Copy of" group as appropriate using Edit Group or slow double-click.
To delete an existing User Group
1.Select File | Manage Users/Groups
2.In the dialog that appears select the Group name in the Groups panel that you wish to delete and then select the Delete Group button.
Note
Any User assignments to the Group will also be removed.
3.Click on the OK button.
To assign a User to a User Group
1.Select File | Manage Users/Groups
2.In the dialog that appears select the User name in the Users panel that you wish to assign to a Group and drag-and-drop it onto the Group name in the Groups panel that you wish to assign it to.
3.Click on the OK button.
Note
The group(s) that a user is assigned to are shown by expanding the User name in the Users panel and the users that are assigned to a group are shown by expanding the Group name in the Groups panel. For example, in the above screenshot, the "AS1-Aus" user is assigned to three (3) groups, namely; "App Support Team 1", "Actual" and "Australia".
To unassign a User from a Group
1.Select File | Manage Users/Groups
2.In the dialog that appears expand the Group name that contains the User assignment that you wish to unassign and select the User name.
3.Click on the Unassign User button.
To import Users and/or Groups (and any matching Permissions) from another Project
1.Select File | Manage Users/Groups
2.Click on the Import button and select From ABACUS File.
3.In the dialog that appears Browse to and open the ABACUS project that contains the Users and/or Groups (and Permissions) you wish to import into the current project and click Open. The Users and Groups will be imported and an Import Results dialog appears summarising the import of the Users and/or Groups. Click on the OK button.
Note
If the imported Users or Groups already existed in the current project then they will be merged with the existing Users or Groups.
4.Click on the OK button back in the main Manage Users/Groups dialog.
5.If there are any matching Types, Viewpoints, Templates or Architectures between the current project and the ABACUS project you're importing from, complete with permissions that don't already exist in the current project, the permissions are imported and a second Import Results dialog appears summarising the import. Click on the OK button.
Note
Permissions are only added to existing Types (and their Properties), Viewpoints, Templates or Architectures for the Groups where the permissions did not already exist for the Group. Either because the Group is new or the Group already existed in the current project but no permissions had been assigned for that Group to that item. There is no 'merging' of permissions for matching items where permissions already existed for the Group in the current project.
To import Users and/or Groups from an Active Directory
1.Select File | Manage Users/Groups
2.Click on the Import button and select From Active Directory.
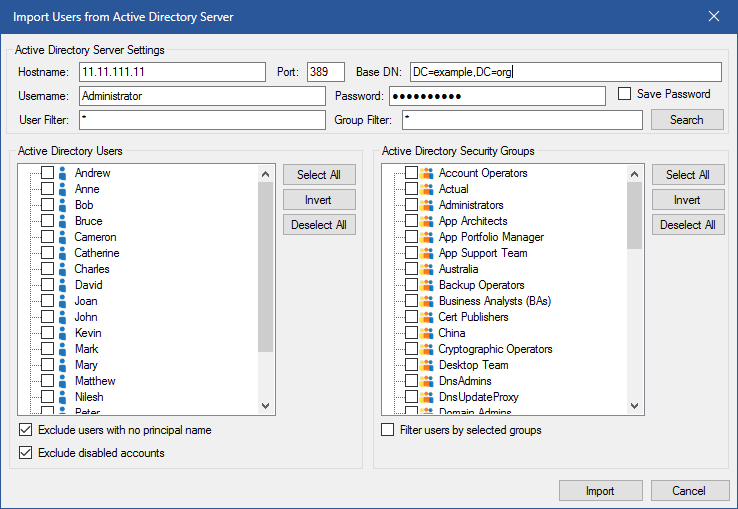
3.Enter either the Server name or the IP address to connect to in the Hostname field. E.g. 1dap.example.org or 11.111.11.11
4.Enter the Port number to access the directory server in the Port field.
Note
The default port that Active Directory uses is 389 and is recommended as it will usually not be changed.
5.Enter the Base DN, the distinguished name of the point where your server will search for users and groups.
Tip
To search the entire directory structure for the server example.org, you would normally need to enter DC=example, DC=org. You may further qualify this to get more specific results by entering org units (OU) or common names (CN). For example to just search the marketing department you may be able to specify OU=marketing,DC=example,DC=org. Contact your Active Directory administrator for more information on your organisation's directory structure.
6.Enter the user login for the server in the Username field.
7.Enter the password login for the sever in the Password field.
8.Optionally check the Save Password checkbox if you wish to preserve the password when importing again.
Note
Details will only be saved once a successful import has been made.
9.Optionally enter a filter in the User Filter to filter out names (the default * character will match all results).
10.Optionally enter a filter in the Group Filter to filter out groups (the default * character will match all results).
11.Click on the Search button and the Active Directory Users/Groups views will be populated with users and groups from the server.
12.Optionally check/uncheck the Exclude users with no principle name checkbox to remove users that don't have a name associated with them from the Active Directory Users view.
13.Optionally check/uncheck the Exclude disabled accounts checkbox to remove users that are Disabled in the active directory.
14.Optionally check/uncheck the Filter users by selected groups to show only users that are part of the selected groups.
15.Select the Active Directory Users/Groups from the Active Directory you wish to import. You can use the Select All button to select all users/groups, the Invert button to select unselected users/groups and deselect selected users/groups, and the Deselect All button to clear all selected users/groups.
16.Click the Import button to import all the selected Active Directory Users/Groups to your project.
Note
Any pre-existing users/groups that share the same name as those that are imported from the Active Directory will be merged where any data that exists including email, password and phone number will overwrite data for the user in the ABACUS project.
See Also
Working with Collaboration Server | SSO Configuration | Working with Feature Permissions | Working with Permissions
© 2001-2024 Avolution Pty Ltd, related entities and/or licensors. All rights reserved.
|