|
You can import your architecture from an Excel spreadsheet (.xls or .xlsx file). The Excel importer allows you to map lists of component and connections with types, standards, properties and standard properties by choosing the columns in your spreadsheet that contain the relevant data. It is however a more advanced technique than the recommended approach for importing from MS Excel which is via catalogues as described here.
 Note Note
The Import from / Export to Excel feature requires that Microsoft Excel 2003 or newer is installed on the computer.
The main function of the Excel Importer is to allow you to define a configuration file (i.e. the hierarchical structure of your architectural model). The configuration file stores a previously saved mapping from an Excel file to an ABACUS file. Once defined, the saved configuration file is later used for further importing of and exporting to .xls files.
Note
The steps shown in the sections below are specifically for users who have yet to define and save a configuration file and are importing from excel for the first time. You must create and save a configuration file to use the export to excel function.
To import an Excel spreadsheet into ABACUS
1.Ensure you have ABACUS open.
2.Select File | New and select From Excel from the dialog that appears and click OK.
Note
If you wish to import into an existing ABACUS project then either right-click the Components node within an Architecture, or right-click an individual component within an Architecture and then select Import | From Excel.
3.The Import Excel Spreadsheet window will be displayed
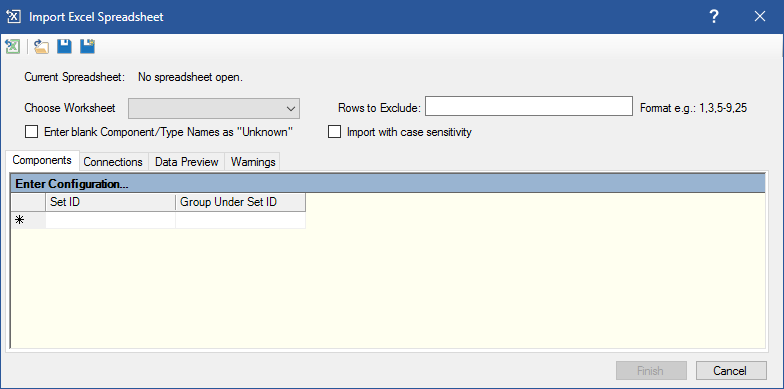
Import Excel Spreadsheet Window
4.Click the Open Excel File icon and browse for the Excel file you wish to import.
5.Choose the Worksheet you wish to import from the drop-down box.
Note
After opening your Excel file, you can use the Data Preview tab to view the columns and first 25 rows of your spreadsheet. From here you can obtain the column numbers needed to fill out the Components and Connections tab.
You can also select whether or not you want components in an excel spreadsheet to be imported with case sensitivity. Simply tick the Import with case sensitivity option (by default this is always ticked) and the spreadsheet will be imported accordingly.
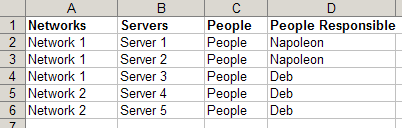
Sample Excel File
Note
In this example we will import a simple Infrastructure and People Architecture from the excel data shown in the above screenshot. Connections will be made between "People Responsible" and the "Servers" that those people administer.
To populate the Components tab
This section is for defining the component types and the hierarchical structure for the configuration file.
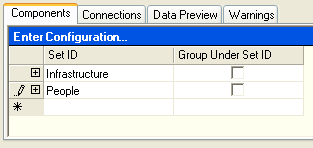
1.Select the Components tab. Rename the Set ID by overriding the (null) value
Note
This feature allows you to define completely different Sets for functionally separate components. As shown in the screenshot below, you may want to distinguish your Infrastructure components from your People components. If there are relationships (connections) between these separate sets of components, they can be defined under the Connections tab. Later in this example we will define connections of type "Administers" between the Infrastructure and People Sets.
You can also select whether or not you want to add a top-level Grouping component for all the elements of the set. Simply tick the Group Under Set ID option (by default this is unticked) and the spreadsheet will be imported accordingly.
Assigning Set ID
2.Once the Sets have been defined select the Set you want to populate and expand by clicking on the [+] sign.
3.Select Levels of Components in this Set from the expanded list.
4.The Component Hierarchy Sets: Set ID window will appear for that Set.
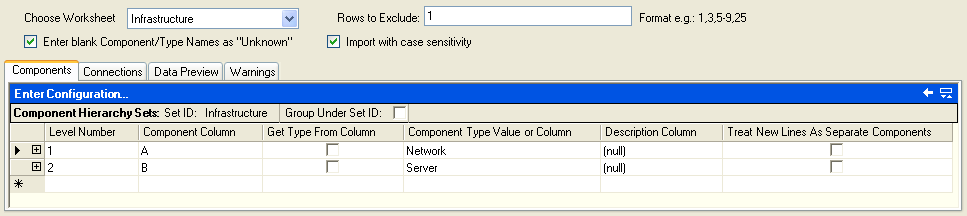
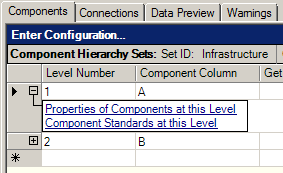
Component Hierarchy and Assigning Values (Set ID: Infrastructure)
5.Rename the Level Number column by overriding the (null) value.
Note
The Level Number column allows you to assign a hierarchy to your components. Each level corresponds to a layer within your architecture whereby the first level is the top most parent level. For example, Level Number "1" corresponds to the topmost hierarchical layer, Level Number "2" is the child of Level Number "1" and so on.
6.Select and assign the relevant column from the Excel spreadsheet to each Level Number by entering it under the Component Column column.
Note
You can choose to exclude certain rows that you do not want to be represented in your architecture. These may be column headers, empty rows, etc. To exclude rows use the Rows to Exclude: text box near the top right-hand corner of the window. In this example we have excluded row 1 because it contains our column headers.
7.You can choose to add descriptions to your components by overwriting the (null) value in the Description Column.
Note
This description is what will appear in ABACUS under the General Properties section | Description field.
8.If a given spreadsheet column has more than one component per cell (entered using Alt-Enter or the CHAR(10) command) then tick the checkbox underneath Treat New Lines As Separate Components. Each line will be imported as separate components.
 Tip Tip
To import a 'matrix' from a collection of columns, where an 'X' in a given 'matrix' cell (cells B2:D2 say) implies that the component specified by the row (in cell A2 say) is connected to the component specified by the column 'heading' (in row 1 say), a simple formula can be used. Enter the following formula for each row in a column beyond the matrix cells (column F say); =IF(B2="","",B$1 & CHAR(10)) & IF(C2="","",C$1 & CHAR(10)) & IF(D2="","",D$1 & CHAR(10)). Then set up a connection set as described below between the components specified by the row (in column A say) and those described by this formula (in column F say). Be sure to check the Treat New Lines As Separate Components option when the components from the formula are imported. For more advanced matrix import, including headings with multiple layers of hierarchy or cells with differing values than just a plain 'X', please contact Avolution Support.
9.Fill in the rest of the columns as needed.
Note
You can choose to get the type from the column rows by ticking the checkbox under the Get Type From Column column and entering the relevant column from the Excel spreadsheet under the Component Type Value or Column column. This will import all components in that column and set them to the type defined in the column. Alternatively, and as with the screen shot above and below, you can choose to use a fixed/pre-defined type name by entering the type name under the Component Type Value or Column column and making sure the checkbox is un-checked.

Component Hierarchy and Assigning Values (Set ID: People)
Note
In this example we wish to have our networks and people groupings at level 1 of the Architecture. At level 2 we wish to have our servers and people responsible for administering those servers. The Components tab has been filled out accordingly, as shown in the two screenshots above. In the first screenshot above we have defined the level 1 (network grouping) and level 2 (server) components for the Infrastructure Set. And in the screenshot immediately above we have defined the level 1 (people grouping) and level 2 (people responsible) components for the People Set.
Alternatively, for the People Set, rather than using column C as a People grouping, we could have used the Group Under Set ID option on the top level components tab and then just entered one People sub-level from Column D. This is shown in the screenshot below.

Component Hierarchy and Assigning Values using Group Under Set ID option (Set ID: People)
10.Once the components have been identified, select the component level you want to populate the properties and/or standards of and expand by clicking on the [+] sign.
11.Select Properties of Components at this Level or the Component Standards at this Level from the expanded list and populate the relevant columns as needed.
Populating Components
Note
Properties of Components at this Level allows you to define properties for components at the chosen level. Component Standards at this Level allows you to define the standards and their standard properties for components at the chosen level.
12.Repeat steps 2 - 11 until all the component levels have been populated for all defined Sets. Use the back arrow near the top right-hand corner of the window to navigate back to the Sets which you defined earlier.
To populate the Connections tab
This section is for defining the connection types and the hierarchical structure for the configuration file.
1.Select the Connections tab. For each set of connections you have to identify the component Set that you want to be the source components and the component Set you want to be the destination components.
2.Underneath the Source Component Set ID enter the Set name which corresponds to the Set defined earlier in the Components tab. Underneath the Source Component Level Number enter the number corresponding to the component level you wish to connect at the source end of the connection.
3.Now choose which component group will be at the destination end of the connection. Underneath the Destination Component Set ID enter the Set name which corresponds to the Set defined in the Components tab. Underneath the Destination Component Level Number enter the number corresponding to the component level you wish to connect at the destination end of the connection.
Note
In this example we wish to connect the people responsible for administering servers to the servers that they administer. The people responsible were defined in the People Set as level 2 components whilst the servers were defined in the Infrastructure Set as level 2 components. The Connections tab has been filled out accordingly, as shown in the screenshot below.

Connections Tab Part 1 of 2
4.If you scroll to the right, you will find extra options for importing your connections. Get Type From Column and Connection Type Value or Column work the same way as for the Components tab.
5.If the Source Component Set ID and the Source Component Level Number are the same as the Destination Component Set ID and the Destination Component Level Number (for example if you are connecting the same component types, such as making connections from servers to other servers) then you need to have another column in your spreadsheet that contains the names of those servers repeated. In this situation you would put that spreadsheet column in the Destination Repeated in Column column. If in that spreadsheet column you have entered more than one connected component per cell then tick the checkbox underneath Treat New Lines As Separate Components.

Connections Tab Part 2 of 2
6.Once the connections have been identified select the connection you want to populate the properties and/or standards of and expand by clicking on the [+] sign.
7.Select Properties for These Connections or Standards For These Connections from the expanded list and populate the relevant columns as needed.
Note
Properties for These Connections allows you to define properties for the chosen connection group. Standards for These Connections allows you to define the standards and their standard properties for the chosen connection group.
8.Repeat steps 2 - 7 until all the connection groups have been defined.
9.When you have finished defining the connection groups, click on the Finish button and your architecture will be created from the imported Excel file. The example above will result in the architecture shown in the screenshot below.
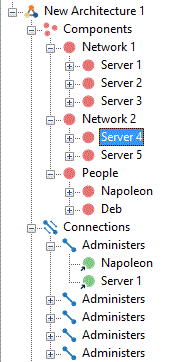
Sample Architecture Imported from Excel
10.Now save the mapped configuration to a file by clicking on the Save Configuration icon. Your saved configuration can be retrieved later by clicking on the Open a Configuration icon near the top left-hand corner of the window.

See Also
Populating your architecture - Overview | Populating your architecture manually | Populating your architecture from Access | Populating your architecture from Visio
© 2001-2024 Avolution Pty Ltd, related entities and/or licensors. All rights reserved.
|