|
A catalogue allows you to view and edit components or connections and their properties in a simple tabular way.
To create a new Catalogue view in ABACUS
 Note Note
While all Architect users can create new Catalogues, to save changes to an existing Catalogue's settings the user requires Configurer access. This is to 'protect' the configuration of existing Catalogues that may be shared by many users. However, Architect uses without the Configurer access can still choose to 'Save As' any new settings to a new Catalogue, also any user can choose to 'revert' any changes to an existing Catalogue. Please contact your local ABACUS Administrator if you require Configurer access. And remember, this is just the settings of the Catalogue, all edits made to the data in the Catalogue are instantly applied to the repository, regardless.
1.Select Insert | Catalogue.
2.In the <Architecture> pull-down select the Architecture that contains the components or connections you wish to view.
3.In the <Element Type> pull-down select the component or connection type that you wish to have the instances listed as 'rows' in the catalogue.
4.The catalogue will be populated with a row for each instance of the selected component or connection type.
Note
By default the left-most Hierarchy Path column (i.e. the hierarchy of parent components or connections above the selected instances) and the 2nd Name column (i.e. the list of the selected component or connection instances) are frozen to the left of the catalogue. To change the column freezing drag the column separator to the right of the Name column. You can re-order columns simply by dragging and dropping their column headings. Cells of columns with a blue underline are hyperlinks to other elements in the project and the hyperlinks can be followed by holding down Ctrl and clicking the links. Columns can be hidden by right-clicking the column heading and selecting Column | Hide Column. Hidden columns can be unhidden by clicking the Configure Columns toolbar button and using the Configure Columns dialog as shown below, or by selecting the down arrow part of the Configure Columns toolbar button and individually selecting the hidden column(s) from either the General, Properties or Attachments collections. Rows can be grouped by their column values by dragging the column heading into the blue grouping bar at the top of the catalogue. At any time you can double click on the catalogue row selector and jump to the corresponding component or connection in the Explorer window. Property cell values are bolded where they are different to the defaults, and italicized where they are read-only. And finally, where there are Required constraints set for a property column these may be shown with a <Required> string (together with colouring according to their enforcement levels) by right-clicking the column heading and selecting Column | Show <Required>.
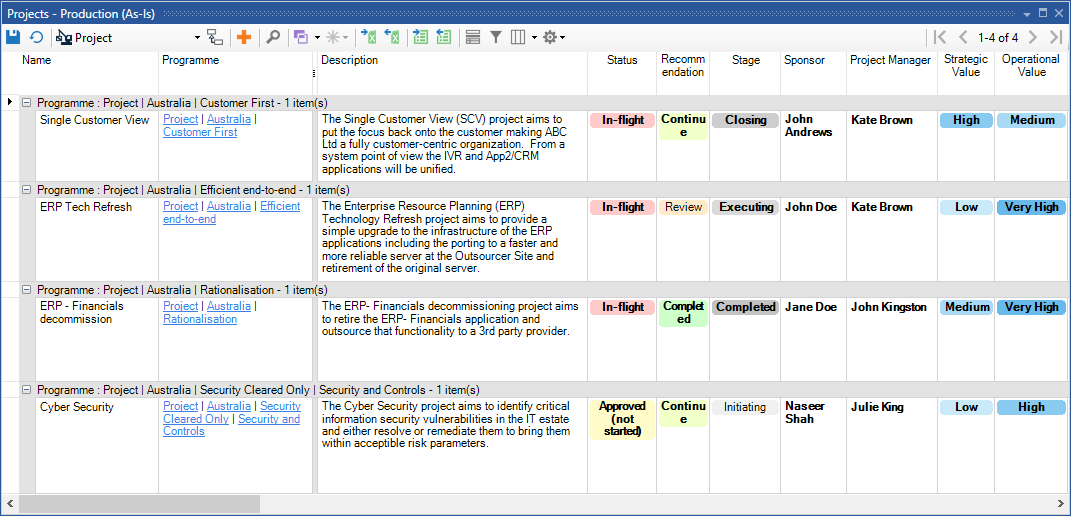
Catalogue
To show / hide Sub Types on a Catalogue view in ABACUS
1.Ensure you have a Catalogue view open.
2.Click the icon shown next to the component type drop-down to show Sub Types of the selected type.
Note
Any component/connection type that has the selected type shown in the catalogue view will be included in the catalogue view with this option selected, while adding an extra column identifying its corresponding type (this column can be hidden).
To add / show columns to a Catalogue view in ABACUS
1.Ensure that you have a Catalogue view open.
2.Hidden columns can be individually unhidden by clicking the arrow on the right of the Configure Columns toolbar button and selecting the hidden column from either the General, Properties or Attachments collections.
Note
A tick mark will be shown next to the currently shown columns for the catalogue. Additionally, only certain attachments will be available under the Attachments section according to the constraints that are defined in your project. In particular, for an attachment to be available to be shown in a component catalogue the component type for the catalogue must be specified as either the source or sink (NOT the 'Any') of a "connection must be attached" constraint for a connection type, and there must also be at least one component type specified as either the source or sink (NOT the 'Any') of the other 'end' of the same connection type.
- OR -
2.Multiple columns can be unhidden (or ordered or fixed) by clicking the Configure Columns toolbar button and using the Configure Columns dialog shown below.
Note
The currently displayed columns are shown in the panel on the right with the available columns shown in the panel on the left. The available columns may be filtered according to the Select Available Columns From pull-down and they may be added by selecting them in the panel on the left and clicking the Add button inbetween the two panels.

Configure Columns dialog
Note
In order to add a new property on the catalogue to be shown in a column, you will need Configurer access or another user with the required access to add the property to the metamodel for the element type that the catalogue it is based on. Click here for more information regarding adding properties to element types.
To rename column headers on a Catalogue view
1.Ensure that you have a Catalogue view open.
2.Right-click the column header for the column you wish to rename and select Rename.
3.Enter the new name for the column and click OK (you can leave the textbox blank to reset the column to its original name).
Note
To set all your column header names back to their default text you can select the gearbox located on the rightmost side of the toolbar icons on the catalogue view, and click Default Column Names to reset all columns.
To remove / hide columns from a Catalogue view in ABACUS
1.Ensure that you have a Catalogue view open.
2.Right-click the column header for the column you wish to remove / hide and select Column | Hide Column.
- OR -
2.Multiple columns can be hidden (or ordered or fixed) by clicking the Configure Columns toolbar button and using the Configure Columns dialog shown above.
Note
The currently displayed columns are shown in the panel on the right with the available columns shown in the panel on the left. The currently displayed columns may be hidden by selecting the column in the panel on the right and clicking the Remove button in-between the two panels.
To show colour / value for properties and attachment columns
1.Ensure that you have a Catalogue view open with a component containing shown properties and/or attachments.
2.Right-click the column header for the column you wish to show colour/value for.
Note
Only properties columns can be coloured, and only attachments have the show colour marker/value option available.
3.For property columns, select the Column|Change Colour option and select whether to colour by Timestamp or Property, then choose whether to colour by range or value with your desired colours to fill in the cell.
Note
Only List, Integer, Decimal, Boolean or Date/Time data type properties will colour by range.
- OR -
3.For Attachment columns, select the Column|Change Colour option and select whether to colour by Timestamp or Property, then choose whether to colour by range or value with your choice of desired colours to colour the property markers.
Note
This does not colour the full cell as there can be more than one attachment in each cell, showing instead a colour marker paired with each attachment. You can select any Property associated with the attachment to be represented in the colour marker. Only List, Integer, Decimal, Boolean or Date/Time data type properties will colour.
- OR -
3.For Attachment columns, select the Column|Show Value option and select whether to show the Timestamp, Property or Attachments.
Note
Selecting the Show Attachment option will require further you to select a Connection Type and a Component Type for the attachments of the attachment you wish to show. This shows all the components of that type that are connected with the chosen Connection Type next to each of the attachments in the column.
4.Click the OK button to apply changes.
To populate using a Catalogue view in ABACUS
1.To add a component or connection of the selected type to the catalogue (and project) click the Add New Component / Add New Connection toolbar button. The row should appear and a component or connection will be created at the top level of the Components or Connections collection for the chosen Architecture.
Note
New components and connections are added by default at the top level of the Components or Connections collection of the chosen Architecture. To change the parent of the new components or connections right-click the Hierarchy Path cell for the new component or connections row and select Change Parent... and choose the desired parent (taking note of the constraint highlighting).
Note
New rows/elements added directly to a catalogue via the 'Add New' button, pasted into the catalogue, or created via importing into the catalogue from MS Excel are exempt from filtering until the catalogue is closed. This is to allow any necessary editing of column values which may not meet the current filtering criteria of the catalogue. These new element rows are indicated by a '+' symbol in the row selector cell at the beginning of the row, which is coloured green if the element currently meets the saved filtering criteria of the catalogue (i.e. will remain on catalogue if re-opened), and red if it does not.
2.To remove a component or connection of the selected type from the catalogue (and project) select the row and either press Del key or right-click the row selector and select Delete from Architecture. The row should disappear from the catalogue and it will be deleted from the project.
To filter using a Catalogue view in ABACUS
1.Ensure that you have a Catalogue view open.
2.If the filter row is not showing at the top of the catalogue then click on the Show Filter Header Row toolbar button.
3.In the column you would like to add a filter, click the filter row cell where it shows '(All)'.
4.For Timestamp, Hierarchy Path, Name or Description general columns or Text, Integer, Decimal, Boolean or Date/Time property columns click the ... button that appears in the right of the filter row cell and enter the cell values that should be included in the catalogue.
Note
For further information concerning the use of filters with the various data types supported by ABACUS, please see filtering.
5.For Attachments columns, Standards columns or List property columns click the down arrow button that appears in the right of the filter row cell and select the cell values from the checkboxes that should be included in the catalogue.
Note
The '(Select All)' checkbox will enable all the other checkboxes, in effect including all the available rows. The '(Non-Blanks)' checkbox will include any non-blank valued rows. The '(Blanks)' checkbox will include any blank valued rows. And finally, unchecking any specific valued checkboxes will automatically unselect the '(Select All)' and '(Non-Blanks)' checkboxes for consistency.
6.Click OK to apply the filter.
To disable/enable filtering on a Catalogue view in ABACUS
1.Ensure that you have a Catalogue view open with a filter applied.
2.Click the check box to the left of the filter row.
To remove a filter from a Catalogue view in ABACUS
1.Ensure that you have a Catalogue view open with a filter applied.
2.To remove an individual column filter right-click the column header and select Column | Clear Filtering.
3.To remove all filters click the Options toolbar button and select Clear Filter Settings.
To save / save as a Catalogue view
Note
While all Architect users can create new Catalogues, to save changes to an existing Catalogue's settings in the project the user requires Configurer access. This is to 'protect' the configuration of existing Catalogues that may be shared by many users. However, Architect uses without the Configurer access can still choose to 'Save As' any new settings to a new Catalogue, and changes made are stored locally and can be used until a Configuer user updates the catalogue settings, also any user can choose to 'revert' any changes to an existing Catalogue. Please contact your local ABACUS Administrator if you require configurer access. Note that these are the settings of the Catalogue, and all edits made to the data in the Catalogue are instantly applied/saved to the repository regardless.
1.Ensure that you have a new or existing Catalogue view open and you have made the necessary changes.
2.In the Catalogue view toolbar click on the Save button to save the Catalogue view and any formatting changes.
Note
If you don't have a Save button in the Catalogue view toolbar then you do not have Configurer access and you are only able to Save As any settings changes to a new catalogue when you go to close the existing catalogue. Your changes will be locally preserved until the catalogue is next updated by another configuer.
3.If the Catalogue Name dialog appears (due to being a new catalogue) enter a name for the catalogue and press OK.
To revert a Catalogue to default settings
1.Ensure the active Catalogue you wish to reload to default settings is open.
2.In the Catalogue view toolbar click on the Reload Settings button.
Note
Reloading settings will dispose of all local changes and set the catalogue settings to the last saved setting made by a Configurer(updates made by Configurers will automatically reload the catalogue settings when detected).
To export to MS Excel catalogue
1.Ensure that you have a Catalogue view open.
2.Click the Export to Excel Catalogue spreadsheet toolbar button.
3.Choose a file name to save the MS Excel catalogue as. Click Save.
Note
By default the exported MS Excel catalogue's filename will be the Catalogue name suffixed by the Architecture name in brackets, e.g. 'Projects (2014 Actual).xlsx'. You can change any of this, including whether the file format is to be .xlsx or .xls. The Architecture name is included to remind the user that each catalogue has specific content (i.e. IDs in column A and row 1) to allow it to be round-tripped back in using Import from MS Excel catalogue as per below.
Note
By default the hidden Column A within the exported MS Excel catalogue contains the unique ID for each of the elements in the ABACUS repository. This allows any changes that are made within MS Excel to be 'matched up' to the existing elements within ABACUS on import (see below). However, the use of this unique ID to 'match up' rows may be overridden with an External | ID property on the element. That is, if the element has an External | ID property and it is included in the catalogue on export then the values of the External | ID column will be used to match up the rows on import (see below) and the unique ID values in the hidden column A will be ignored (and can even be blank). The hidden Column A itself must remain, however, in particular the value in cell A1. Furthermore, when adding external ID’s to an existing ABACUS element collection we recommend adding them as a different property first, e.g. External | Temp and then renaming the property to External | ID. Otherwise duplicate elements will be added.
Catalogue formatting is exported by default, however, for large catalogues this may result in the export being quite slow. Accordingly, in Tools | Options... then on the Catalogue tab, you are able to reduce the amount of formatting that is exported as shown on the Catalogue tab below, thereby speeding up the export.
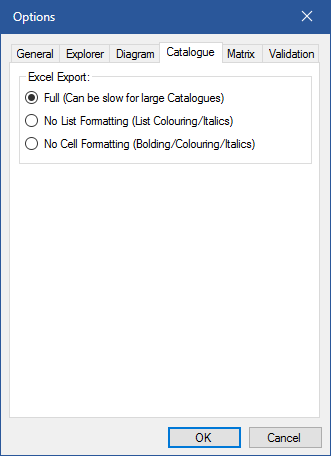
Catalogue export options
4.An Export Completed dialog is displayed. Click OK.

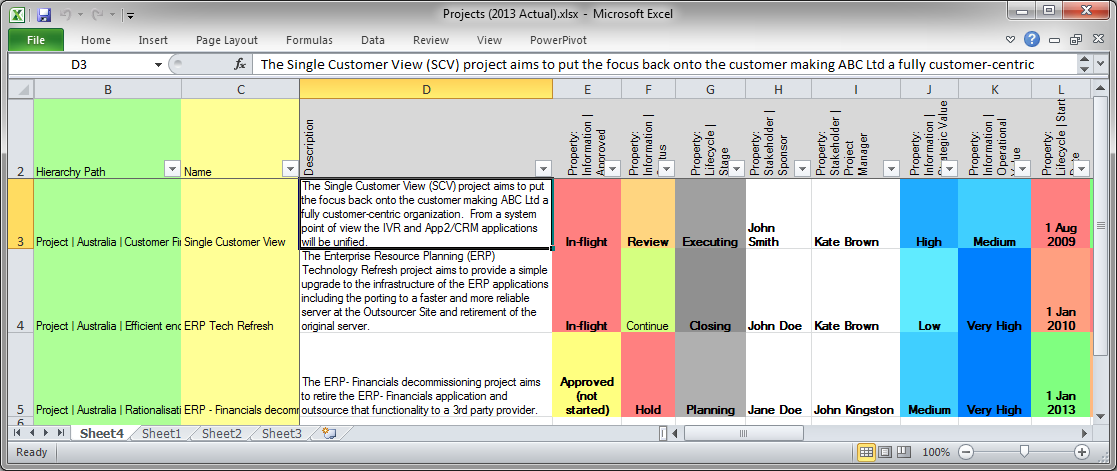
Exported to MS Excel catalogue
To import from MS Excel catalogue
Note
By default the hidden Column A within the exported MS Excel catalogue (see above) contains the unique ID for each of the elements in the ABACUS repository. This allows any changes that are made within MS Excel to be 'matched up' to the existing elements within ABACUS on import. However, the use of this unique ID to 'match up' rows may be overridden with an External | ID property on the element. That is, if the element has an External | ID property and it is included in the catalogue on export (see above) then the values of the External | ID column will be used to match up the rows on import and the unique ID values in the hidden column A will be ignored (and can even be blank). The hidden Column A itself must remain, however, in particular the value in cell A1. Furthermore, when adding external ID’s to an existing ABACUS element collection we recommend adding them as a different property first, e.g. External | Temp and then renaming the property to External | ID. Otherwise duplicate elements will be added.
1.Ensure that you have a Catalogue view open.
2.Click the Import from Excel Catalogue spreadsheet toolbar button.
3.Choose a file name to import the MS Excel catalogue from. Click Open.
4.New Errors Detected and/or New Errors/Warnings Detected dialogs may appear for any new content (i.e. rows in the MS Excel) that was added. Take note of the errors/warnings and click OK.
5.An Import Completed dialog is displayed and it may show warnings due to the import (see notes below). Click OK.
6.A Change List dialog will be displayed showing all the changes that have occurred in pre-existing elements. Click OK.
Note
For the assigned Standards or attached Component columns, new entries via the MS Excel catalogue must match exactly the name of an existing Standard or Component of the correct type for the assignment or connection to be added. The first named match will be used and any unmatched entries will generate a warning as per below. Furthermore, while warnings are given on re-import, elements are not deleted from ABACUS if they are not present in the MS Excel catalogue. This is because there is no way that ABACUS can know whether the assigned Standard or attached Component exists in the ABACUS project but doesn't exist in the MS Excel catalogue because it has been deleted from the MS Excel catalogue or has been added to the ABACUS project since the catalogue was exported. Accordingly, if users wish to easily 'detect' which connections have been added during the import process they can simply create a required property on the connection type and set it's default to blank so that they will be warned of any new connections each time the import is completed.
Note
When importing a MS Excel catalogue various warnings may be displayed. Firstly, if a new column was added to the Excel that doesn't match the 'syntax' for a property or attached component the column will be ignored. Next, line-by-line warnings will be displayed for any issues with the data on each row of the Excel catalogue. These warnings begin with the row number in square brackets and if relevant the column label (i.e. '[23,J] ...' for row 23, column J) and may refer to deleted items, unmatched Standards or attached Component names (which are ignored as per note above) or an invalid or blank ID relating to a new row / element (that will be added). For a detailed article on populating ABACUS using Excel catalogues please refer to the Avolution Community or the Portfolio Manager training course.
Note
New components and connections are added by default at the top level of the Components or Connections collection of the chosen Architecture. To change the parent of the new components or connections right-click the Hierarchy Path cell for the new component or connections row and select Change Parent... and choose the desired parent (taking note of the constraint highlighting).
Note
Elements added directly to a catalogue via the 'Add New' button, pasted into the catalogue, or created via importing into the catalogue from MS Excel are exempt from filtering until the catalogue is closed. This is to allow any necessary editing of column values which may not meet the current filtering criteria of the catalogue. These new element rows are indicated by a '+' symbol in the row selector cell at the beginning of the row, which is coloured green if the element currently meets the saved filtering criteria of the catalogue (i.e. will remain on catalogue if re-opened), and red if it does not.
To export to Google Sheets catalogue
1.Ensure that you have a Catalogue view open.
2.Click the Export to Google Sheets tool bar button.
3.You will be asked to connected to your Google Account, firstly logging in and then allowing ABACUS to view and manage the files in your Google Drive. If you have already connected to your google drive, you can click the Switch Accounts link in the bottom left corner at any point in time to switch the account you are connected to.
4.Choose the file name and a folder to export to. You can use the tools available to help you locate the place you wish you store your export with the Home button to go to the Root directory, the Go Up button to move up a level, the Search button entering a search in the search textbox and clicking the it to find folders and files, the Stop Searching button to clear the search. Click Export.
Note
By default the exported Google Sheet spreadsheet catalogue's filename will be the Catalogue name suffixed by the Architecture name in brackets, e.g. 'Projects (2014 Actual)'. You can change this if you wish to. The Architecture name is included to remind the user that each catalogue has specific content (i.e. IDs in column A and row 1) to allow it to be round-tripped back in using Import from Google Sheets catalogue as per below.
Note
By default the hidden Column A within the exported Google Sheet spreadsheet catalogue contains the unique ID for each of the elements in the ABACUS repository. This allows any changes that are made within Google Sheet spreadsheet to be 'matched up' to the existing elements within ABACUS on import (see below). However, the use of this unique ID to 'match up' rows may be overridden with an External | ID property on the element. That is, if the element has an External | ID property and it is included in the catalogue on export then the values of the External | ID column will be used to match up the rows on import (see below) and the unique ID values in the hidden column A will be ignored (and can even be blank). The hidden Column A itself must remain, however, in particular the value in cell A1. Furthermore, when adding external ID’s to an existing ABACUS element collection we recommend adding them as a different property first, e.g. External | Temp and then renaming the property to External | ID. Otherwise duplicate elements will be added.
Catalogue formatting is exported by default, however, for large catalogues this may result in the export being quite slow. Accordingly, in Tools | Options... then on the Catalogue tab, you are able to reduce the amount of formatting that is exported as shown on the Catalogue tab below, thereby speeding up the export.'
5.An Export Completed dialog is displayed and you will have the option to click the Open in Google Docs link to open the exported catalogue in your google drive. Click OK.
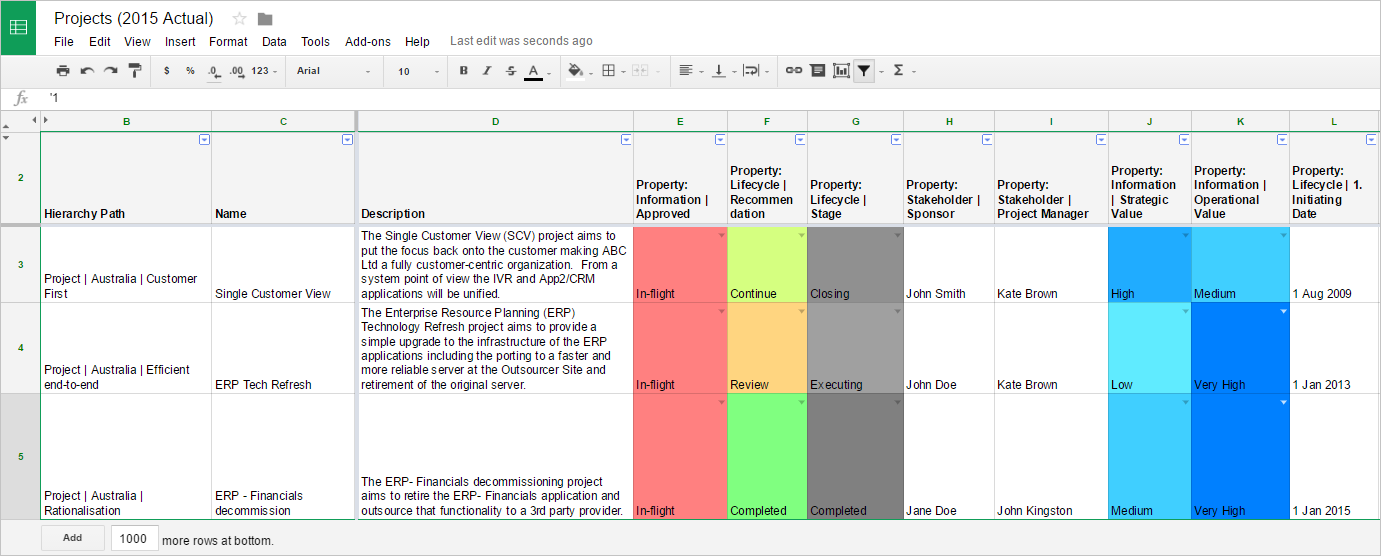
Exported to Google Sheets catalogue
To import from Google Sheets catalogue
Note
By default the hidden Column A within the exported Google Sheet catalogue (see above) contains the unique ID for each of the elements in the ABACUS repository. This allows any changes that are made within MS Excel to be 'matched up' to the existing elements within ABACUS on import. However, the use of this unique ID to 'match up' rows may be overridden with an External | ID property on the element. That is, if the element has an External | ID property and it is included in the catalogue on export (see above) then the values of the External | ID column will be used to match up the rows on import and the unique ID values in the hidden column A will be ignored (and can even be blank). The hidden Column A itself must remain, however, in particular the value in cell A1. Furthermore, when adding external ID’s to an existing ABACUS element collection we recommend adding them as a different property first, e.g. External | Temp and then renaming the property to External | ID. Otherwise duplicate elements will be added.
1.Ensure that you have a Catalogue view open.
2.Click the Import from Google Sheets toolbar button.
3.You will be asked to connected to your Google Account, firstly logging in and then allowing ABACUS to view and manage the files in your Google Drive. If you have already connected to your google drive, you can click the Switch Accounts link in the bottom left corner at any point in time to switch the account you are connected to.
4.You can either enter the URL for the Google Sheet spreadsheet by checking the ...or, enter the URL of a Google Sheets spreadsheet checkbox or choose the file name and a folder to import from with the Select a spreadsheet from your Google Drive checkbox. You can use the tools available to help you locate the spreadsheet you will import with the Home button to go to the Root directory, the Go Up button to move up a level, the Search button entering a search in the search textbox and clicking the it to find folders and files, the Stop Searching button to clear the search. Click Import.
5.An Import Completed dialog is displayed and it may show warnings due to the import (see notes below). Take note of the errors/warnings and click OK.
6.A Change List dialog will be displayed showing all the changes that have occurred in pre-existing elements. Click OK.
Note
For the assigned Standards or attached Component columns, new entries via the Google Sheets spreadsheet catalogue must match exactly the name of an existing Standard or Component of the correct type for the assignment or connection to be added. The first named match will be used and any unmatched entries will generate a warning as per below. Furthermore, while warnings are given on re-import, elements are not deleted from ABACUS if they are not present in the Google Sheet spreadsheet catalogue. This is because there is no way that ABACUS can know whether the assigned Standard or attached Component exists in the ABACUS project but doesn't exist in the Google Sheet spreadsheet catalogue because it has been deleted from the Google Sheet spreadsheet catalogue or has been added to the ABACUS project since the catalogue was exported. Accordingly, if users wish to easily 'detect' which connections have been added during the import process they can simply create a required property on the connection type and set it's default to blank so that they will be warned of any new connections each time the import is completed.
Note
When importing a Google Sheet spreadsheet catalogue various warnings may be displayed. Firstly, if a new column was added to the Excel that doesn't match the 'syntax' for a property or attached component the column will be ignored. Next, line-by-line warnings will be displayed for any issues with the data on each row of the spreadsheet catalogue. These warnings begin with the row number in square brackets and if relevant the column label (i.e. '[23,J] ...' for row 23, column J) and may refer to deleted items, unmatched Standards or attached Component names (which are ignored as per note above) or an invalid or blank ID relating to a new row / element (that will be added).
Note
New components and connections are added by default at the top level of the Components or Connections collection of the chosen Architecture. To change the parent of the new components or connections right-click the Hierarchy Path cell for the new component or connections row and select Change Parent... and choose the desired parent (taking note of the constraint highlighting).
Note
Elements added directly to a catalogue via the 'Add New' button, pasted into the catalogue, or created via importing into the catalogue from Google Sheets spreadsheet are exempt from filtering until the catalogue is closed. This is to allow any necessary editing of column values which may not meet the current filtering criteria of the catalogue. These new element rows are indicated by a '+' symbol in the row selector cell at the beginning of the row, which is coloured green if the element currently meets the saved filtering criteria of the catalogue (i.e. will remain on catalogue if re-opened), and red if it does not.
To compare the content of a catalogue with another architecture
1.Please refer to the topic here.
See Also
Populating your architecture - Overview | Populating your architecture manually | Populating your architecture from Visio | Populating your architecture from Excel
© 2001-2024 Avolution Pty Ltd, related entities and/or licensors. All rights reserved.
|