|
Validation of constraints in ABACUS support real-time checking for instant feedback if an action were to break constraints, background checking against current user actions based on their perceived read access, targeted validation of entities subject to constraints (Architectures, Components or Connections) which can be triggered due to any hierarchy and topology constraints that have been defined for the project. It should be noted that all known errors must be resolved before a Collaboration Server project can be committed.

Real-time model checking and constraint validation
ABACUS includes a real-time Model Checking and Validation feature to immediately display the effects a given user operation will have.
The real-time constraint validation feature is most noticeable when populating with diagrams or directly in the Explorer window. In particular, during the following operations, guidance is given using colour highlights as to the effect the operation will have on the warnings and errors with the current project;
1.When dragging elements onto or around a diagram the colour of the parent (or attaching) component's (if any) border will be coloured according to the scheme described below.
2.When connecting components using the right-click drag | Connect To feature the list of available Connection Types is coloured according to the scheme described below.
3.When connecting components on diagrams using the Connector Mode the cursor will change colours according to the scheme described below.
4.When adding sub-components the list of available Component Types is coloured according to the scheme described below.
In general the following colours by default are used to indicate the effects the user operation will have on the warnings and errors with the current project;
Black : No impact on warnings or errors.
Green : The operation is explicitly in accordance with defined hierarchy and topology constraints for the project.
Red : The operation is explicitly in breach of the defined hierarchy and topology constraints for the project and will result in warnings and/or errors.
 Tip Tip
Click here to see how you can customise constraint colours.
Background model checking and reporting constraint validation
ABACUS includes a Validation feature to display all the warnings and errors known with the current project based on the constraints that have been defined. It should be noted that all Errors must be resolved before a Collaboration Server project can be committed.
As changes are made, validation will run a check on the affected entities involved and perform an isolated validation check for any errors or warnings. The ability to automatically validate changes can be toggled on or off in the options configuration.
 Note Note
A full Validation can be ran using the 'Validate/Check Project Constraints' button on the Main toolbar or with the Full Validation button in the Validation toolwindow. The Validation window is hidden by default but will appear when the toolbar button is clicked. See Customising the interface for how to show the toolwindow or turn off auto-hide.
Note
Certain changes will require full validation to meet Collaboration Project requirements when committing including:
•Changes to type properties
•Read permissions changed on types or architectures for the current user
•User being switched
•Assigned user groups changed for current user
Tip
You can double-click any row in the Validation window to 'jump' to the relevant entity in the project.
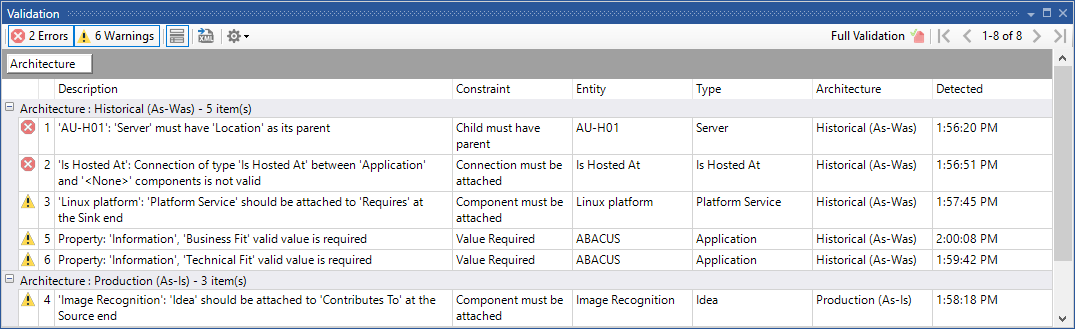
Validation window
The default columns in the Validation window are described as follows;
Warning or Error: This column displays an icon for whether the violation is a Warning (yellow triangle with an exclamation mark) or Error (red circle with a cross).
Number: This column displays the violation number.
Note
Only 200 violations are shown at a time and if there are more than 200 violations in a project the Start, Prev, Next and End row navigators at the top-right of the window can be used to browse the additional violations.
Description: This is a full description of the violation including the Entity and Constraint concerned.
Entity: This column displays the Entity of concern to the violation.
Type: This column displays the element type for the Entity.
Architecture: This column displays the Architecture within which the violation has occurred.
Detected: This column displays the time that the violation was detected.
Tip
It is useful to sort descending by the Detected column (as shown in the dialog above) to ensure the most recent violations appear at the 'top' of the list.
The toolwindow options in the window can be selected via the gear drop down and are as follows;
Autosize Rows: Rows will auto-size height accordingly to fit content.
Pop-up on New Error: The toolwindow will show when a new validation error/warning is detected.
Columns: Show / hide columns in the window.
Manually targeted validation
You can selectively validate a particular part of your project for the supported types including Architectures, Components or Connections and validation will run against it and its children.
1.Right-click on the node in the explorer view and select Check Constraints.
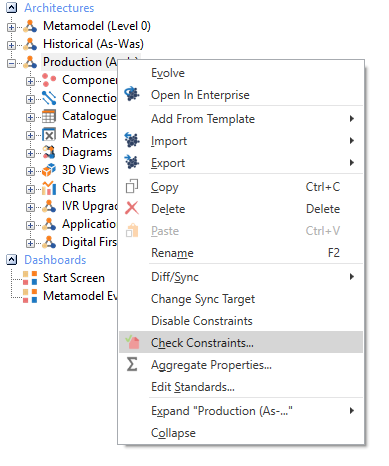
Validate constraints
2.Click the Details button on the Warnings window to see where the architecture violates any constraints that have been defined.
Note
Violations are only shown for those constraints that have been set to Warned or Enforced. Furthermore the wording of the warning will include 'should' if the constraint was just a warning or 'must' if it was Enforced.
3.Click OK.
See Also
Understanding and Defining Constraints | Validation Options
© 2001-2024 Avolution Pty Ltd, related entities and/or licensors. All rights reserved.
|