|
When you start ABACUS, you'll see the main screen, which is empty except for the menus and toolbar at the top, an empty Explorer window and the title-bar. This screen will be the hub of your interaction with ABACUS.
The main elements are:
•the main menus
•the toolbars
•the right click menu
•the explorer and property windows
•the status bar

The main menus
The menus are arranged in a logical order.

The menus are described as follows;
•File menu - The File menu allows you to create, open, close, save, export and publish ABACUS files. It also allows you to create, open, close and save ABACUS Library files.
•Edit menu - The Edit menu allows you to cut, copy, paste, delete, rename, find and sort elements and undo / redo operations.
•View menu - The View menu allows you to open or close the various interface Windows and status bar, navigate forwards and backwards, go to specific views and manage dashboards.
•Insert menu - The Insert menu allows you to add new standards, templates, types, elements, viewpoints, catalogues, diagrams, charts, reports and matrices.
•Analysis menu - The Analysis menu allows you to run evaluations against an architecture including; performance, financial, reliability and complexity.
•Tools menu - The Tools menu allows you to open algorithms and scripts, and open SharePoint Sync, Technopedia, ServiceNow, and set goals for the architecture, and re-optimise your files compression. You can also modify the program's options and customise the interface from the tool menu.
•Window menu - The Window menu allows you to dock, arrange, show and hide the windows you have open.
•Help menu - From the Help menu you can access online ABACUS help documentation or local ABACUS help file. You can access the web site, view your license agreement and view general details about ABACUS including the version of the software and ABACUS support and contact details. You can provide feedback via the issue notification page. If required, you can enter a registration key via the Help menu.
 Tip Tip
You can choose to use online ABACUS help documentation or local ABACUS help file by changing the Use local ABACUS help option in Tools -> Options -> General. This option is unavailable for ABACUS Cloud.
This is the order you'll typically follow when you're carrying out your tasks; Once you've created or opened a file, you'll normally populate your architecture, then view it (in Explorer, diagrams, 3D, Charts, etc). At this point, you'll either run an evaluator, or you'll repeat the process with the same architecture or a different architecture. (See How to use ABACUS (Overview) for further details.)
Have a look through the main menus and try to imagine how you'll apply them to your system.
 Note Note
You can Customise your menus at any time.
The toolbars
By default there are the following toolbars;
•the Main toolbar - 
•the View toolbar - 
•the Diagram toolbar (if a diagram is open) - 
Tip
Have a look through the buttons on each toolbar by hovering over them to see the tool-tip (shortcut-key).
Note
Only certain buttons will be active depending on what you have selected in the Explorer window. Additionally, the 'Validate' button on the Main toolbar will be enabled when a change to the underlying repository requires a re-validation of the project.
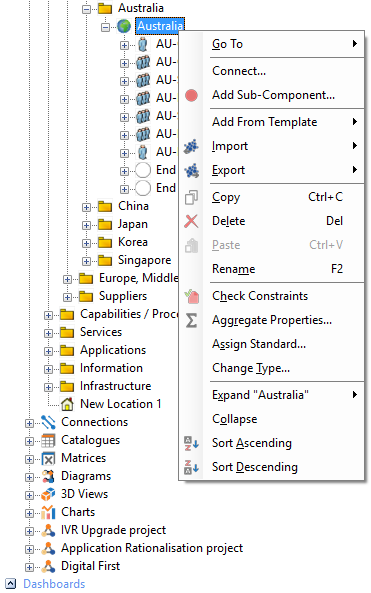
The right-click menu
The main menus and toolbars are not used for everything, though. It is often more convenient to use the right-click context menu for various operations. (Also, not all the commands available through right-click are available via the main menus, toolbars, or keyboard commands.)
For example, once you've created a file, and you have a tree diagram of your architecture, it is better to right-click on Architectures in the tree to add a new architecture. Similarly, you should right-click on Components to add a new component. Right-click on a few things in the tree to see what you can do.
Tip
Generally, you'll use the main menus to perform the more high-level tasks, like evaluating your architecture. The low-level tasks - like adding individual components and connections - are done using the toolbars and/or right-click menu.
The explorer and properties windows
When you open or create a file, a tree diagram will display in the Explorer window. It's a window into your architecture. And as you select elements within the Explorer window three other windows; the General Properties, References and Properties windows will update to reflect detailed information about your selection.
Note
The General Properties, References and Properties windows are hidden by default. See Customising the interface for how to unhide them and potentially leave them permanently displayed.
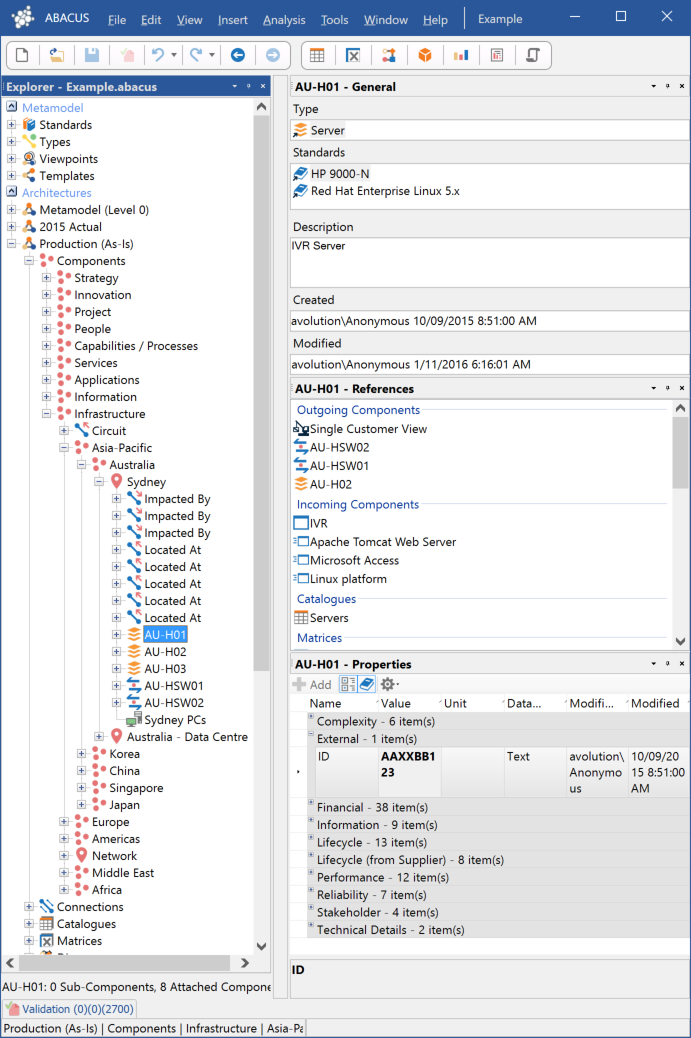
While you're building your architecture, the Explorer and Properties windows are the most useful representation. Because they can be collapsed and expanded as required, and they don't become cumbersome.
The Explorer window has a Tree (and Status bar) and the Properties windows have 5 sections:
•Type
•Standards
•Description
•References
•Properties
ABACUS considers all of these things to be part of the architecture.
Tree
This section has a tree grouped into 3 areas as follows:
1.Metamodel
•Standards - If numerous components have the same set of properties, you can define the set up-front, and then just assign it to the components. The same goes for connections and any of the other elements. These sets of standard properties are stored in the Standards branch of the tree. Instead of defining every property for every component, and every property for every connection etc, just assign a standard. For example the standard characteristics of Unix-HP/UX can be saved as a Standard and assigned to any components using the Unix-HP/UX operating system as shown for the OS01 server in the screenshot above.
•Types - This branch of the tree is a library of the types of components and connections you can use. Types are used to define the metamodel for your architecture and for classification and filtering when viewing your architecture. They also determine a template for what standards, properties and constraints your components/connections can have.
•Viewpoints - Viewpoints can be created from existing diagrams and can be used to create new diagrams. They are diagram stencils.
•Templates - Templates store reusable patterns of components and connections along with the way in which they are represented or viewed. They can be thought of as "mini" architectures or solutions that can be placed into existing architectures.
2.Architectures - The Architectures branch of the tree is where you build the architecture(s) of your system. (This is called populating the architecture.) You can have any number of architectures in a single ABACUS file.
3.Dashboards - The Dashboards branch of the tree is where you can access any saved dashboards for the project.
Note
Items in the Explorer tree that have had their Update permission removed (i.e. they are read-only) are shown in grey.
Type
This section denotes the specific component or connection type of the currently selected element in the tree.
Standards
This section provides a list of the standards for the currently selected element in the tree.
Description
This section provides a brief description of the selected element in the tree. Any related hyperlinks can also be added to this section. These include websites or local absolute paths pointing to further information about the given element. Multiple lines are also allowed. Valid hyperlinks need to start with one of 5 strings; http://, https://, ftp://, file:/// or mailto:.
Tip
For hyperlinks with spaces, users can type in the URL or path, select the required text and Right Click | Hyperlink. This will change any spaces to %20 so the whole URL or path will work correctly.
Created and Modified
These sections provide the user and date/time for the creation of, and last modification to, the currently selected element in the tree.
References
This section provides a list of the outgoing and incoming components for the currently selected element in the tree. It also shows the Catalogues, Matrices, Diagrams, 3D and Chart views that the currently selected element appears in and if an element type is selected it will also show all the places that type is being used in. If a diagram is selected it shows the Viewpoint if applicable for the diagram and for views in general it shows any Dashboards the view appears in and when a Standard is selected in the tree it shows the usage of the standard by types, components and connections.
Properties
This section is where you define the characteristics of the elements within your architecture, like the way you require it to perform, the number of lines of code it has, the percentage of these lines that are comments, etc.
The 'input' and 'output' properties of the pre-built simulators will be shown in the Properties window with a property input row selector icon ( ) and output icon ( ) and output icon ( ) respectively with a tooltip indicating which pre-built simulator the property is related to, e.g. 'Complexity Output' or 'Performance Input'. The arrow on the output icons will highlight Red ( ) respectively with a tooltip indicating which pre-built simulator the property is related to, e.g. 'Complexity Output' or 'Performance Input'. The arrow on the output icons will highlight Red ( ) when the property is out of date due to an underlying property or structural change to the repository with the simulator requiring re-simulation according to the Red highlighting on Simulation toolbar. ) when the property is out of date due to an underlying property or structural change to the repository with the simulator requiring re-simulation according to the Red highlighting on Simulation toolbar.
The status bar
The left portion of the status bar shows the full path to the currently in-focus repository element, either selected in the Explorer window or on the diagram canvas. This is so that the exact place in the repository hierarchy for the given element can always be easily determined. The right hand portion of the status bar shows various operational messages such as 'Open ABACUS File Successful' and 'Cost Calculation Completed'.
See Also
How you do it (Overview) | Customising the interface | What is architecture? | How is an architecture represented in ABACUS? | Working with ABACUS files
© 2001-2024 Avolution Pty Ltd, related entities and/or licensors. All rights reserved.
|