|
You can synchronise your architecture with ServiceNow tables. Synchronisation involves mapping existing ServiceNow tables to ABACUS types, with the full tables representing a type, a row for each component and each field a property or connection attachment, then importing the data from ServiceNow to ABACUS.
 Note Note
The ServiceNow Sync feature requires that a ServiceNow URL is set up and available to synchronise with, along with the credentials required to connect.
Note
To synchronise a ServiceNow table with an ABACUS project the user license needs the ServiceNow Sync add-on capability. Please contact your local ABACUS Administrator or Avolution Support if you require this capability.
Note
If the use of a HTTP proxy server is required, you will be prompted for the authentication.

To create a new mapping between an ABACUS component type and an existing ServiceNow table
1.Ensure you have ABAUS Open.
2.Select Tools | ServiceNow Sync...
3.The ServiceNow Sync dialog should now be opened.
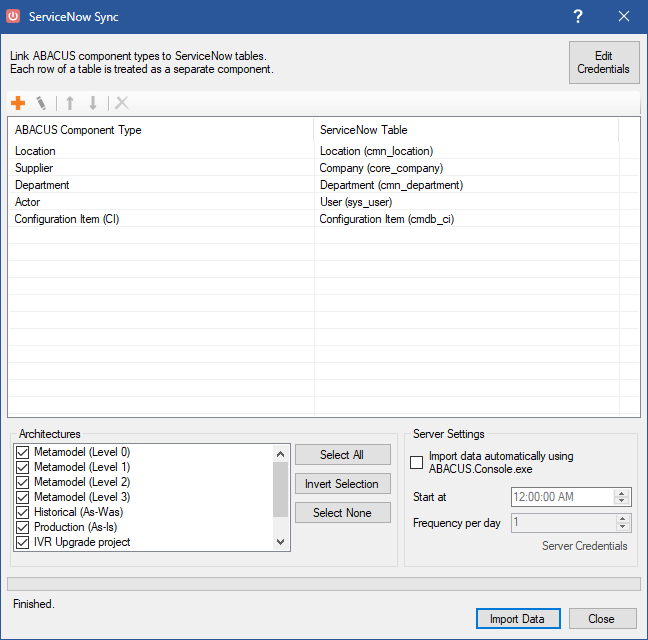
ServiceNow Dialogue
4.Enter your ServiceNow sites credentials and URL into the Credential Dialog (optionally select to save your credentials to your local machine).
5.Click the  button and a ServiceNow mapping dialog will appear as shown below. button and a ServiceNow mapping dialog will appear as shown below.
Note
You can also edit any previous mapping created by clicking the button after selecting a mapping. button after selecting a mapping.
6.Select the Component Type from the Component type list you wish to map to.
7.Select the Table from the Table list you wish to map from.
Note
The login used to connect to ServiceNow will need at minimum read-access to the following tables in order to be able to view your ServiceNow tables:
- sys_dictionary
- sys_db_object
- sys_glide_object
Note
To be able to import the data from your Database Views, you may need additional permissions in order to read from these views and it is recommended to have read-access to the following ServiceNow tables:
- sys_db_view
- sys_db_view.*
- sys_db_view_table
- sys_db_view_table.*
Note
When creating mappings for database views, the component type requires a element ID property to be mapped to be a value on the database view. Should the ID not be unique, rows with matching IDs will overwrite the element.
8.For each Component Type attribute you wish to map to the corresponding ServiceNow Table column, select an item in the left panel and the right panel respectively and click Assign. Click the Unassign button after selecting a mapping in the Mapping panel to remove the mapping.
Note
As a minimum to allow synchronisation the Component Name needs to be mapped to a Table column, otherwise the Create Mapping button will not be enabled.
Note
Table columns with the reference data type can be mapped to attachments or if selecting a component type property/attribute can select a choice of non-reference columns that belongs to the reference that are displayed after selecting the assign button.
 Tip Tip
Some mappings can be represented as their raw values rather than display values by unchecking the Display Value associated with the attribute-column mapping. Note that you cannot turn display values on for Attachment attributes.
9.Select the Create Mapping button once you have finished assigning the properties and attachments.

ServiceNow Mapping Dialogue
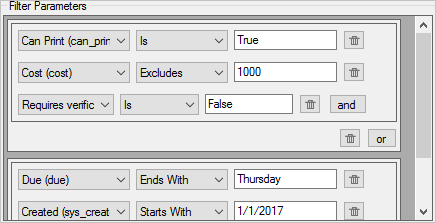
To filter your ServiceNow Table(s) Mappings
1.Ensure you have a valid mapping of component type to a ServiceNow table open.
2.Click the Add Filter button.
3.Select the property you wish to check in the first drop-down box.
4.Select the type of check you wish to make in the second drop-down box.
5.Enter the value/regular expression in the textbox.
6.Optionally click the And button to add more parameters to your filter.
7.Optionally click the Or ... button to create more filters.
Note
When using the filter, only data from the ServiceNow tables that matches up with the filter parameters created will be imported with the mapping that it is created with.
To synchronise your ServiceNow Table(s) into ABACUS
1.Ensure you have ABACUS open.
2.Select Tools | ServiceNow Sync...
3.Enter your ServiceNow sites credentials and URL into the Credential Dialog (optionally select to save your credentials to your local machine).
4.Ensure you have at least one mapping and have satisfactorily adjusted all your existing mappings. Please follow the instructions above to do so.
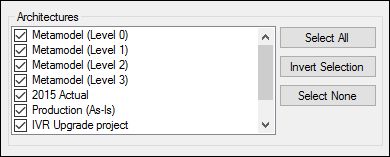
5.Select the architectures by checking the items you wish to import the components to in the Architectures panel. You can select all the items with the Select All button, deselect selected items and select unselected items using the Invert Selection button, and unselect everything with the Select None button.
5.Click the Import Data button.
6.On successful completion, either a Message dialog will pop up reporting on the amount of newly created Components/Connections and Synchronisations or a Warning dialog reporting on the partial completion of the import and any errors that occurred.
To set-up your ServiceNow Console settings
1.Ensure you have ABACUS open.
2.Select Tools | ServiceNow Sync...
3.Enter your ServiceNow sites credentials and URL into the Credential Dialog (optionally select to save your credentials to your local machine).
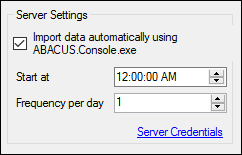
4.Select the Import data automatically on ABACUS Console checkbox.
5.Enter your ServiceNow sites credentials into the Credential Dialog.
Note
Entering these credentials will allow other users of this file to use the ABACUS.console.exe to import with this ServiceNow credential.
Tip
You can click the underlined Server Credentials link to change these settings any time you want.
6.Enter the time of the day for the import to occur for the Start at field.
7.Enter the number of times a day for the import to occur for the Frequency per day field.
Tip
Based on the number input for Frequency per day, the occurrences of Importing data from ServiceNow will change to operate at equally divided times of a full day starting at the specified start time e.g. if the frequency was 4 and the start time was 3:00:00 PM, the server would run the import at 3:00:00 PM, 9:00:00 PM, 3:00:00 AM and 9:00:00 AM.
Note
You will be given the option to save your server settings/table mappings on exiting the dialog.
See Also
Populating your architecture - Overview | Populating your architecture manually
© 2001-2024 Avolution Pty Ltd, related entities and/or licensors. All rights reserved.
|