|
A matrix allows you to view and edit the 'direct' connections between components in a simple tabular way and to also view the 'indirect path' between components according to any intermediate components (and connections).
To create a Matrix view in ABACUS
 Note Note
While all Architect users can create Matrices to save them and/or their settings the user license needs Configurer access. This is to 'protect' the configuration of existing Matrices that may be shared by many users. However, Architect uses without configurer access can still choose to 'Save As' any new settings to a new Matrix. And of course all user licenses can choose to 'Discard' any changes to an existing Matrix. Please contact your local ABACUS Administrator or Avolution Support if you require this capability.
1.Select Insert | Matrix.
2.In the <Architecture> pull-down select the Architecture that contains the components and connections you wish to view.
3.In the <Source Type> pull-down select the component type that you wish to have the instances listed as 'rows' down the left of the matrix.
4.In the <Sink Type> pull-down select the component type that you wish to have the instances listed as 'columns' across the top of the matrix.
5.In the <Path Type(s)> pull-down there are essentially two 'modes' of matrix you can define ...
'Direct' connections matrices
6.Simply select one (1) or more connection types on the right hand side of the menu that appears if you wish to see in the 'cells' of the matrix if an explicit connection exists from the Vertical / 'row' component of the matrix to the Horizontal / 'column' component of the matrix.
Note
Only connections with the source end attached to the Vertical / 'row' component and sink end attached to the Horizontal / 'column' component will be shown. Switch the Source and Sink component type selections to view the connections in the opposite direction.
7.The matrix will be populated with an 'X' in the cells (or a property value - see note below) if there is a connection from the Vertical / 'row' component of the matrix to the Horizontal / 'column' component of the matrix.
Note
For large matrices only a maximum of 100 rows or columns (including collapsed rows/columns) will be shown at a time as shown by the 'R' and 'C' indicators in the top-left header cell respectively. To view additional rows use the scroll bars. At any time you can double click on the Vertical / 'row' or Horizontal / 'column' component headings and jump to the corresponding components in the Explorer window(or right-clicking for the context menu and selecting the Show in Explorer option). The parents of the Vertical / 'row' and Horizontal / 'column' components are also optionally shown as heading rows / columns with a grey heading title. When collapsed (by single clicking the heading cell) if children attachments existed then an 'X' will optionally be shown if all the children were attached or an 'O' will optionally be shown if only some of the children were attached.
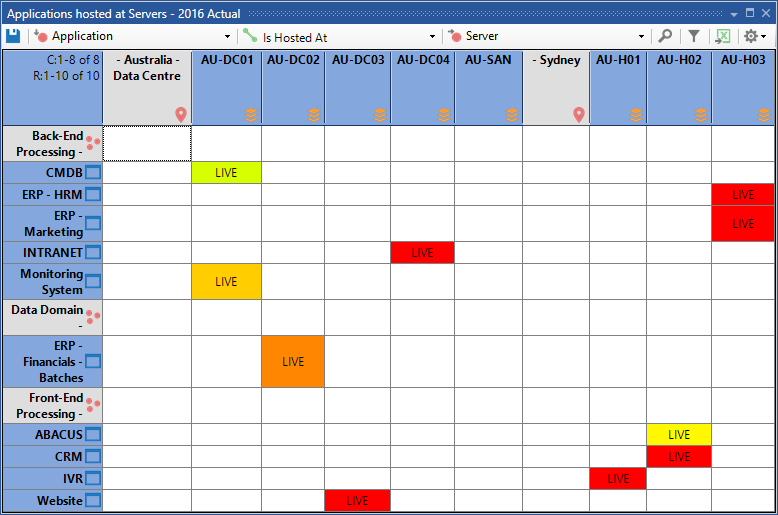
Direct connections matrix showing the Servers where Applications are hosted with colouring and a property being shown instead of the generic 'X'
- OR -
'Indirect' connections matrices
6.Select a sequence of connection types and component types and optionally the parent / child hierarchy options on the right and left hand side of the menu that appears if you wish to see in the 'cells' of the matrix of an indirect path of connected and optionally parent / child components that exist from the Vertical / 'row' component of the matrix to the Horizontal / 'column' component of the matrix.
Note
Any valid path that includes the elements selected in the path menu will be shown regardless of the direction of the underlying connections, however, when selecting the path the first and last elements selected must be connection types. Furthermore, the order of the elements that have been selected is shown with a numerical prefix in square ('[ ]') brackets and a given type may be included multiple times in the path (as indicated by the numerical prefix). Consecutive selection of component types or connection types or parent / child is interpreted as an 'OR' path. Switch the Source and Sink component type selections to view the paths in the opposite direction.
7.The matrix will be populated with a path / collection of components in the cells if there is a path from the Vertical / 'row' component of the matrix to the Horizontal / 'column' component of the matrix.
Note
For large matrices only a maximum of 100 rows or columns (including collapsed rows/columns) will be shown at a time as shown by the 'R' and 'C' indicators in the top-left header cell respectively. To view additional rows use the scroll bars. At any time you can double click on the Vertical / 'row' or Horizontal / 'column' component headings and jump to the corresponding components in the Explorer window. The parents of the Vertical / 'row' and Horizontal / 'column' components are also optionally shown as heading rows / columns with a grey heading title. When collapsed (by single clicking the heading cell) if any children paths existed then an 'X' will optionally be shown if all the children were attached or an 'O' will optionally be shown if only some of the children had paths.
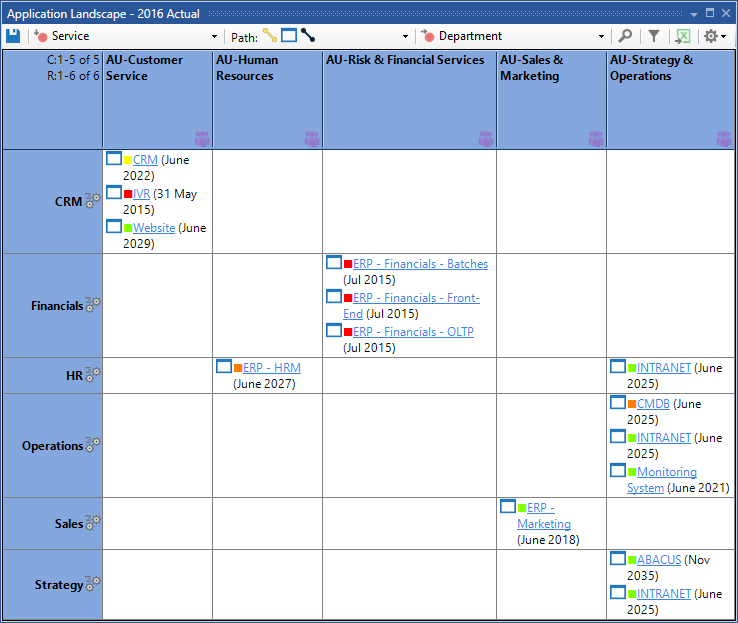
Indirect connections matrix showing the Applications that implement a given Service by Department
To filter a Matrix view in ABACUS
1.Ensure that you have a new Matrix view open.
2.Click the Filter Axes 'funnel' at the top-right of the matrix toolbar.
3.On the Source and/or the Sink tabs add Name, Property, Description, Hierarchy or Standard filters by clicking the Add button, selecting a Property if necessary and clicking OK. Select the relevant options in the Keywords/Items panel using the logic / syntax as described in the note below. The preview panel will automatically update to show the results of current set of filters.
Note
For further information concerning the use of filters with the various data types supported by ABACUS, please see filtering.
4.On the Source and/or the Sink tabs click the checkbox 'Exclude Source/Sink Components without content' to hide components that do not have a connection with the other selected Source/Sink component.
To populate using a Matrix view in ABACUS
Note
You can only add/remove connections where a single connection type has been used for the Path described above.
1.To add a connection of the selected type between a Vertical / 'row' component and a Horizontal / 'column' component of the matrix, where an 'X' does not already exist (or a shown property value - see note above), double click the cell. An 'X' should appear (or a property value - see note above) and a connection will be created at the top level of the Connections collection for the chosen Architecture.
Note
The connection name will be the connection type name as per the connection type setting of the matrix and if a property value is being shown instead of an 'X' the default value for the property will be shown.
2.To edit a shown property value on the connection between a Vertical / 'row' component and a Horizontal / 'column' component of the matrix, double click the cell, or right-click the cell and select Edit Value..., and edit the value in the Change Value dialog.
3.To remove a connection of the selected type between a Vertical / 'row' component and a Horizontal / 'column' component of the matrix, where an 'X' already exists (or a shown property value - see note above), right-click the cell and select Disconnect. The X should disappear and the connection will be deleted from the project.
To save / save as a Matrix view
Note
While all Architect users can create Matrices to save them and/or their settings the user requires Configurer access. This is to 'protect' the configuration of existing Matrices that may be shared by many users. However, Architect uses without the Configurer access can still choose to 'Save As' any new settings to a new Matrix. And of course all user licenses can choose to 'Discard' any changes to an existing Matrix. Please contact your local ABACUS Administrator if you require the Configurer access. And remember, this is just the settings of the Matrix, all edits made to the data in the Matrix are instantly applied to the repository, regardless.
1.Ensure that you have a new Matrix view open and you have made the necessary changes.
2.In the Matrix view toolbar click on the leftmost Save Matrix button to save the Matrix view and any formatting changes.
Note
If you don't have a Save button in the Matrix view toolbar then you don't have Configuer access and you are only able to Save As any settings changes to a new matrix when you go to close the existing matrix.
3.If the Matrix Name dialog that appears (due to being a new matrix) enter a name for the matrix and press OK.
To export to MS Excel matrix
1.Ensure that you have a Matrix view open.
2.Click the Export to Excel toolbar button.
3.Choose a file name to save the MS Excel matrix as. Click Save.
Note
By default the exported MS Excel matrix's filename will be the Matrix name suffixed by the Architecture name in brackets, e.g. 'Applications hosted at Servers (2014 Actual).xlsx'. You can change any of this, including whether the file format is to be .xlsx or .xls.
Matrix formatting is exported by default, however, for large matrices this may result in the export being quite slow. Accordingly, in Tools | Options... then on the Matrix tab, you are able to reduce the amount of formatting that is exported as shown on the Matrix tab below, thereby speeding up the export.
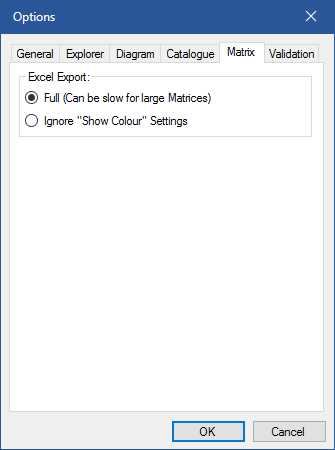
Matrix export options
4.An Export Completed dialog is displayed. Click OK.

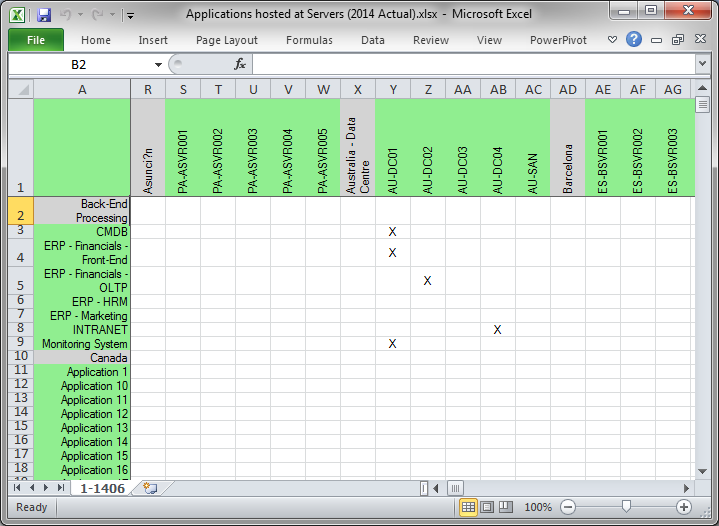
Exported to MS Excel matrix
Matrix Settings
Matrices have a variety of settings that can be used to manipulate how the matrices data is laid out and presented and show extra details, major ones including Sort, Swap Axis, Colour Settings, Groups, Show Value Settings and Sizing which are all accessible by clicking the Options 'gear wheel' at the top-right of the matrix toolbar.
•To Sort your components on their corresponding axis, click on either of the component to sort and then with three options available which include Alphabetical Order, Reverse-Alphabetical Order or Natural Order (The order that is shown in explorer), select the sorting you prefer.
•To Swap Axis, click the swap axis option in the context menu placing the horizontal axis on the vertical axis and vertical axis on the horizontal axis.
Note
The axis' will retain their own relevant settings for Grouping and Sorting.
•Selecting Colour Settings... and then the Edit button and selecting the Colour by Timestamp or Colour By Property option and choosing a property, the Min and Max value range and choosing colours, however, only List, Integer, Decimal, Boolean or Date/Time data type properties will colour. If collapsed the cell will be coloured according to the average property value of the connections.
Note
Indirect matrices will not colour the cell, rather the colour for the component instead and if collapsed won't show a colour. You can also edit the properties value for the component by double clicking the color glyph to open a dialog that lets you adjust the value.
•Instead of an 'X', property values for the cells may be shown by selecting Show Value Settings... and then the Edit button and selecting the Show property option and choosing a property.
Note
Indirect matrices will show values for each of the component rather than a single value for a connection that indirect matrices do. You can also edit the properties value for the component by double clicking the text value to open a dialog that lets you adjust the value.
•To Group the axis', selecting either the Group Horizontal Axis or Group Vertical Axis to group the components by their type.
•To show all content of the cells, Autosize Rows is available to expand rows to automatically fit row component names and contents.
 Tip Tip
You can reset your rows/columns size at any time via Reset Row Heights and Reset Column Widths and to set everything back to default, clicking the Reset All Settings option.
See Also
Populating your architecture - Overview | Populating your architecture manually | Populating your architecture from Visio | Populating your architecture from Excel
© 2001-2024 Avolution Pty Ltd, related entities and/or licensors. All rights reserved.
|