|
ABACUS' Publish to Web feature allows architectural models to be viewed via a secure web site. Architectures are exported to HTML format and are designed to reflect the look and feel of the Explorer in ABACUS. Views (including Catalogues, Diagrams, 3D and Charts) are also exported into formats viewable using an internet browser.
 Note Note
Currently, Viewpoints and Matrices are not published.
To publish your architectural models to the web
1.Ensure you have the relevant ABACUS file open, containing the populated architecture that you want to publish to the web.
2.Select File | Publish....
3.The Publish To Web Configuration window will display.
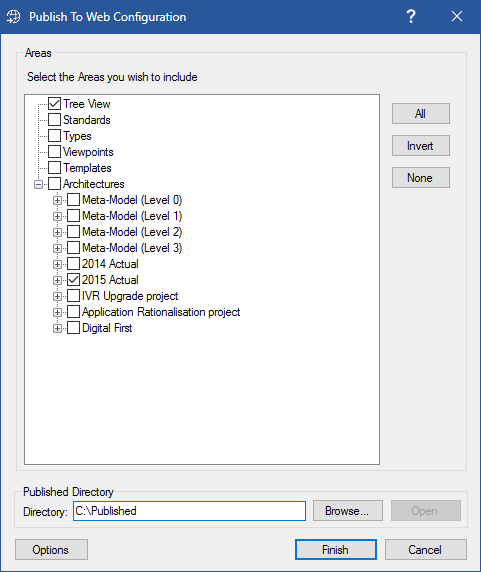
Publish to Web Configuration
4.By default the Tree View and all Architecture(s) and their contents are checked. Uncheck any portions you don't want to publish to the web, including any individual views within the architecture(s).
 Tip Tip
If you want to hide specific components, connections and/or their properties it is recommended that an Administrator creates a 'Public' role using ABACUS' role-based access feature and then removes the Read permission from those component types, connection types and/or properties that they do not wish to be published. Then a user should log in under that role and publish to web as ABACUS will only publish elements that have Read permission set for the role. Furthermore, users can auto-publish from the command line as described here.
Note
You may select all the portions displayed by clicking on the All button or invert your selection by clicking on the Invert button. You can also click on the None button to clear your selection.
Note
If you uncheck the Tree View option then no tree frame (see below) will be published. Accordingly, you should select a start page according to step 6 below or after publishing you will need to customise either the top-level; a) index.html file by changing the 'frame src="mainPage.html" name="element_details"' line to directly link to the relevant html page under the Content folder, or, b) mainPage.html by providing a hyperlink or redirect to the relevant html page under the Content folder.
5.Click the Option button and the following Publisher Options dialog will display.
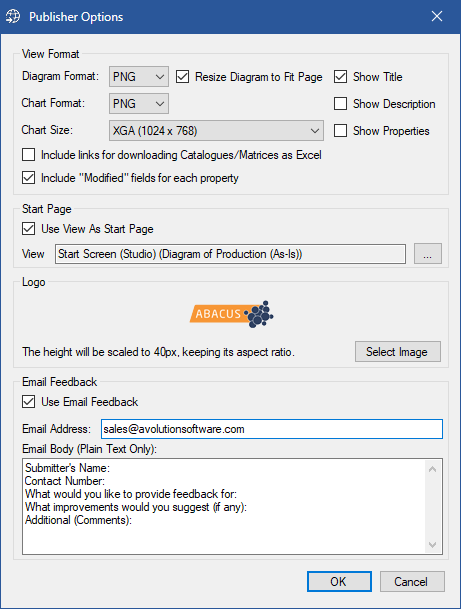
Publisher Options
6.Select the Diagram and Charts formats and whether to show the Title, Description or Properties for the views out of the available options (refer to the note below for comments on the various formats).
7.Check the Include links for downloading Catalogues/Matrices as Excel option to include excel versions of the files in the published content folders accessible via a Download link available in the corresponding catalogue/matrix.
8.Check the Include "Modified" fields for each property option to include the Modified dates of properties in the published model.
9.If you wish to set the starting page of the published model to a particular view then check the Use View As Start Page option and browse to the view via the '...' button that becomes enabled.
Note
Only the views selected in the Areas section as per Step 4 above are available to be set as the starting page.
10.If you wish to receive feedback on specific pages in the published model then make sure the Email Feedback option is selected, enter an email address in the Email Address textbox and edit the Email Body section as appropriate. If you don't wish to have feedback sent then uncheck the Email Feedback option and leave the textbox empty.
11.Click on the OK button.
12.Click on the Browse button
13.The Browse for Folder window will display.
14.Select the location you want to store the top-level HTML file (and any automatically generated files).
Note
It is a good idea to create a specific folder (typically called "Published") using the Make New Folder button at the bottom of the dialog to store the top-level HTML file and any automatically generated files.
15.Click on the OK button.
16.The folder path will display in the Directory textbox. Optionally, enter and folder path you wish to publish to along with any other auto-generated files.
17.Click on the Publish button to publish your project.
- or -
17.Click on the Save button to save your publish settings which are used when publisher is ran by user scripts (please visit our ABACUSom.chm help documentation to find out more).
Note
Exporting of Diagrams very occasionally fails, most often when the computer is out of memory (normally when using very large files). A failed export will be retried once. There will be one warning for a failed initial attempt, and a second warning if the re-attempt fails. Therefore, if the only warnings are "initial attempt failed" ones, the publish was successful. If the re-attempt fails try publishing a smaller portion of your file or free up some system memory..
Note
The published project needs a localhost to run, and can be viewed by either starting the StartLocalWebServer.exe located in the folder selected to export to or opening the publisher through the Publish To Web Configuration window selecting the Open button with the chosen folder selected.
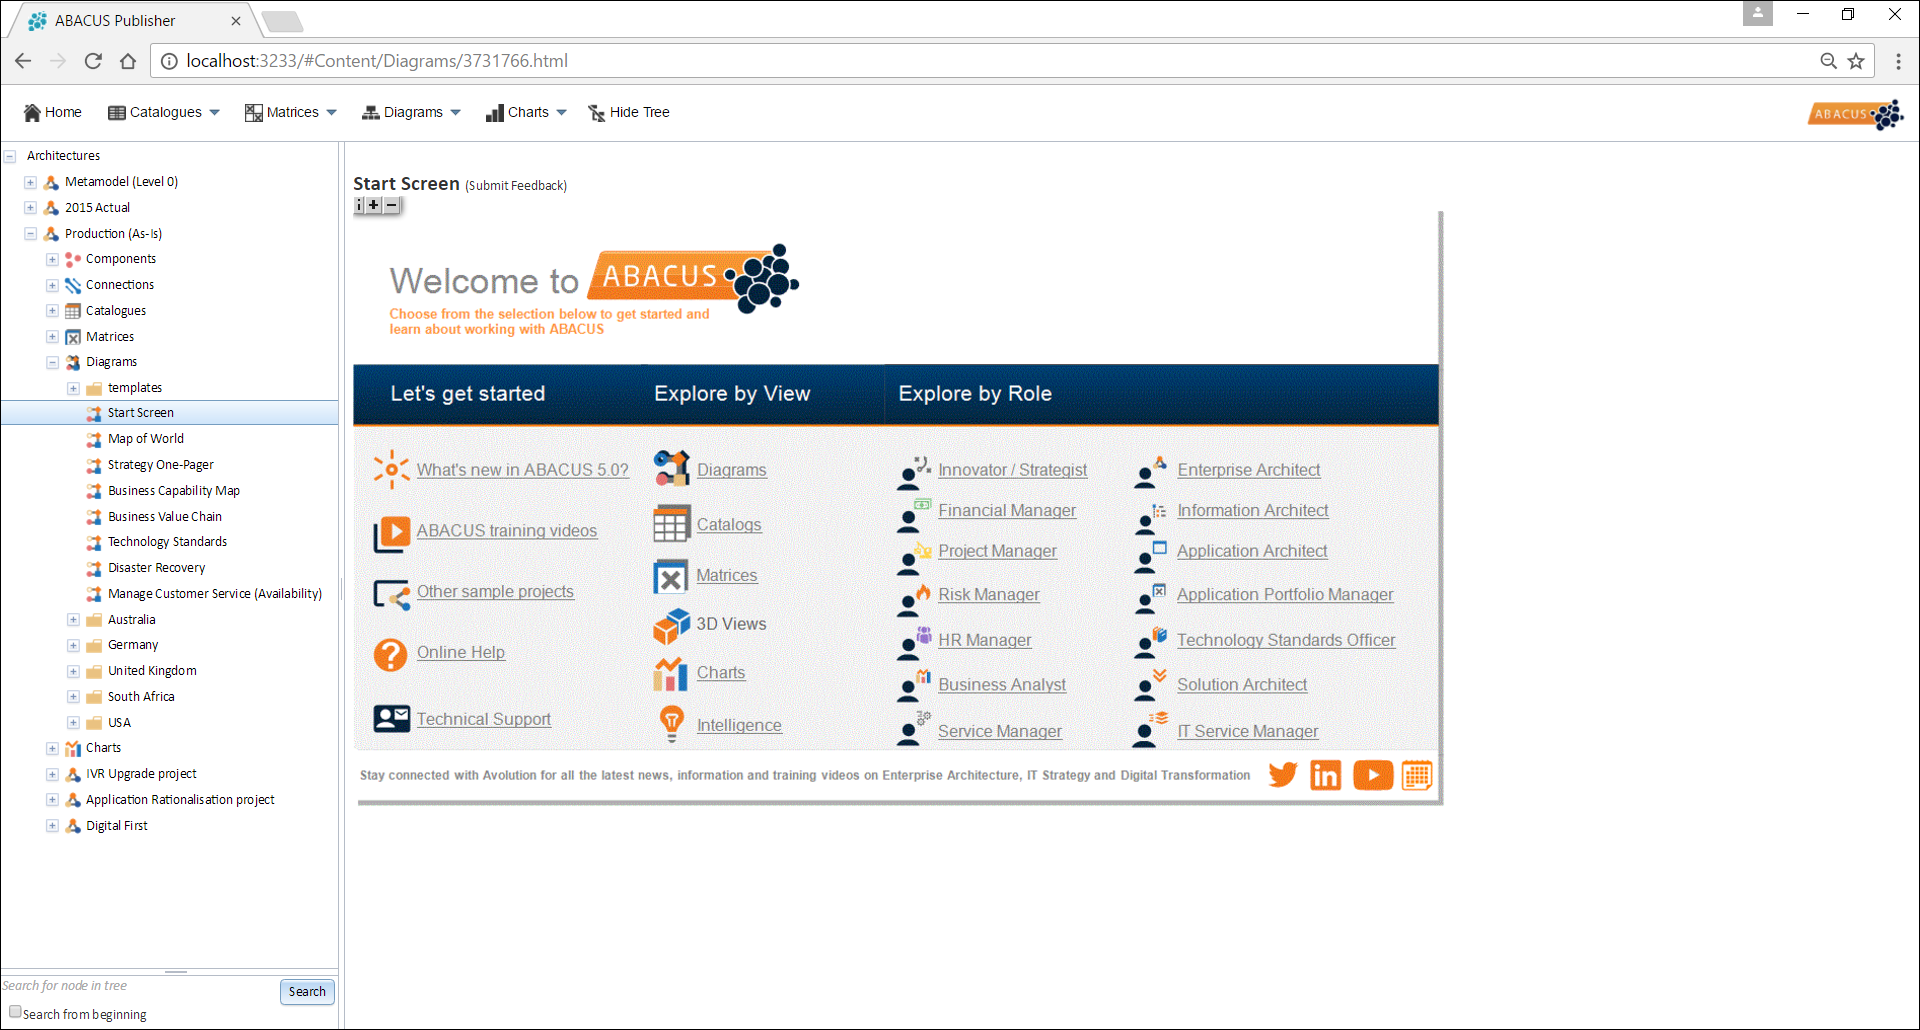
Publish to Web in Google Chrome 54.0
Any hyperlinks that were created in the original model will be persisted in the published model and clicking on the link will follow the link to its destination (if it was published). Furthermore, any elements in published diagrams that aren't already hyperlinked in the original model will by hyperlinked back to their corresponding elements in the Tree view (if it was published) and by clicking the element in the published diagram the focus will jump back to the relevant location in the Tree. This feature is similar to the "Show In Explorer" right-click feature in ABACUS.
Note
Avolution strongly recommends the following software and file formats should be used to fully utilise the Publish to Web functionality in ABACUS:
1.Internet Explorer (8.0 and above) to view the published explorer view. Google Chrome (48.0 or later) and Mozilla Firefox (3.0 or later) are also recommended and fully supported, however, if using the recommended SVG format for diagrams then in Firefox 9 you can only use the native SVG viewer support which unfortunately does not allow zooming or panning.
2.Adobe SVG Viewer 3.0 plug-in (download from here) and SVG file format for the published diagrams. The SVG image format for the diagrams is recommended because; SVG is a vector-based image format and therefore it is 'loss-less' and looks far better at any given zoom level than any of the other formats, SVG can be imported into MS Visio, SVG can be zoomed to any level or resolution, SVG has links back to the tree view for the connections (not just the components), SVG always prints at a better resolution, and, SVG is about half the file size of the other formats. PNG is the next recommendation, however, as it is a rasterised format at certain zoom levels the clarity of the view will be lost and clicking connections on diagrams will not jump back to the relevant location in the tree. BMP is discouraged as while it is a 'loss-less' format the file size is 100x that of the other formats and 20Mb images are not unusual.
The trade-off with SVG is that an SVG viewer will need to be installed and you need to make sure that .svg image/svg+xml is added the web server's MIME types. After installation of the SVG viewer Microsoft Internet Explorer will ask you to accept the viewer's license agreement and then it should work fine. And whilst Mozilla Firefox supports SVG files natively, the Adobe plugin is still recommended to be able to zoom the diagrams if you are using Firefox 8 or earlier (if you are using Firefox 9 you cannot disable the native SVG viewer). Once the installation for the Adobe plugin has been run, the following steps are required use it in Firefox:
•Open up firefox and enter "about:config" (without the inverted commas) into the URL bar.
•Scroll down and find the property svg.enabled (if you are using Firefox 9 then the native SVG viewing cannot be disabled and this property does not exist). Double click on it to disable it.
•Now find the directory where the SVG plugin is installed (e.g. C:\Program Files\Common Files\Adobe\SVG Viewer 3.0\)
•Copy the files NPSVG3.dll and the NPSVG3.zip and paste them into the firefox plugins directory (e.g. C:\Program Files\Mozilla Firefox\plugins)
•Close down all instances of firefox
3.PNG file format for the published Chart views. The PNG image format for the Chart views is recommended because while it is a rasterised format and there is 'loss' the trade-off between file size and chart clarity is typically the best. BMP is discouraged as while it is a 'loss-less' format the file size is 20x that of the other formats and 2Mb charts are not unusual.
If you want to change the look and feel of the web pages, you can edit the starting page file named mainPage.html and the style sheet file named abacus.css. You will find these files in the same folder where you chose to save the top-level HTML file and in the include folder located at the same level. For more information on the structure and tailoring of the published output see the next section.
The structure of ABACUS published models
The ABACUS published model is structured as follows:
1.The top-level folder contains several files and assuming all options are included in the ABACUS Publish to Web Configuration dialog it will include an index.html which opens the mainPage.html, and then shortcutError.html page. There is an include folder (discussed below), dijit folder and dojo folder which are used to replicate the Explorer tree from ABACUS, and a settings.js file containing instructions for the layout of the published project, and also a StartLocalWebServe.exe executable which will boot up a local host server and run the published project on your default web browser. The logo.png is a picture used as a logo to put in the top right corner of the published model. The mainPage.html is a static HTML page that can be tailored with corporate logos and the like and will be shown unless a start page is chosen when publishing. And finally, the shortcutError.html page is a landing page for any broken shortcuts from the tree due to the appropriate pages not being published.
Tip
You can skip the mainPage.html altogether by choosing to use a start page when publishing or modifying the settings.js file to point directly to a given view (say) by editing the initial line which may look like 'START_PAGE = "mainPage.html";' to point refer directly to any other page in the contents folder. You can also adjust other settings for the published model here manually, though it is recommended to not adjust anything unless you know what you are doing as incorrect changes can break the published project model and prevent it from running.
2.The top-level include folder containing various javascript (.js) and cascading style sheet (.css) files used by the .html files throughout the published model.
3.The top-level Content folder contains, alphabetically;
•An Architectures folder with a numbered HTML page for each architecture that was published. See the notes below for information on the file numbering scheme.
•A Catalogues folder containing a numbered HTML page for each of the published catalogues. See the note below for information on the file numbering scheme.
•A Charts folder with a numbered HTML page and a PNG, JPG etc file for each of the published Chart views. See the note below for information on the file numbering scheme.
•A Components folder containing a numbered HTML page for each of the published components. See the note below for information on the file numbering scheme.
•A Connections folder containing a numbered HTML page for each of the published connections. See the note below for information on the file numbering scheme.
•A Diagrams folder containing a numbered HTML page and a PNG, SVG etc file for each of the published diagrams. See the note below for information on the file numbering scheme.
•An icons folder with various images used throughout the published model.
•A Matrices folder containing a numbered HTML page for each of the published matrice. See the note below for information on the file numbering scheme.
•A Standards folder with a numbered HTML page and a PNG, SVG etc file for each of the published diagrams. See note below for information on the file numbering scheme.
•A Templates folder with a collection of numbered sub-folders for each template published from the project. Within each sub-folder is a Components and a Connections folder and within these is a numbered HTML page for each component and connection of the template. See the note below for information on the folder/file numbering scheme.
•A Types folder with Component and Connection sub-folders and a collection of sub-folders for each type published from the project containing an page for each of the constraints.
•A Viewpoints folder and a numbered HTML page for any of the Viewpoints that were published. See the note below for information on the file numbering scheme.
Note
The numbering of the HTML pages (and in some cases the image files) matches the unique ID for each repository object that was set when it was created within ABACUS (referred to as EEIDs). This ID does not change so as diagrams, types, components etc are updated they will retain the same ID as before. In every case, the relevant repository object name may be found near the start of the HTML page between the <div> … </> after the first <h1> ...</h1> HTML tags inside <object >...</>
Restricting Access to Certain Pages/Views with IIS
If using IIS as your web server for the published model, you may be able to restrict access to certain pages/views utilising the method below:
1.Create a website in IIS (another one if there is an existing one you don’t want to interfere with).
2.Change the Properties->Directory Security->Anonymous access - uncheck anonymous access, and use authenticated access.
3.If this is just a normal server with no domain complications etc, then you should use the ‘integrated windows authentication’ option which would then use the server machines local users/logins as the authentication, and just add users to the local computer (being careful that you are aware of the implications, security wise, of adding new users to the machine, e.g. depending on whether remote access is setup for the machine, etc).
4.Add permissions to the specific files/folders as required. Right click the individual files/folders -> Properties, and adjust the security permissions as you would normally for files/folders.
This may differ depending on what version of IIS and what specific Windows OS is on the server, and whether you have a domain or other different setup.

See Also
Populating your architecture | Analysing your architecture
© 2001-2024 Avolution Pty Ltd, related entities and/or licensors. All rights reserved.
|